Now Reading: DIY Idea: Upcycle Old Denim into a Stylish Tote Bag
- 01
DIY Idea: Upcycle Old Denim into a Stylish Tote Bag
DIY Idea: Upcycle Old Denim into a Stylish Tote Bag
Introduction: Give Your Old Jeans a New Life
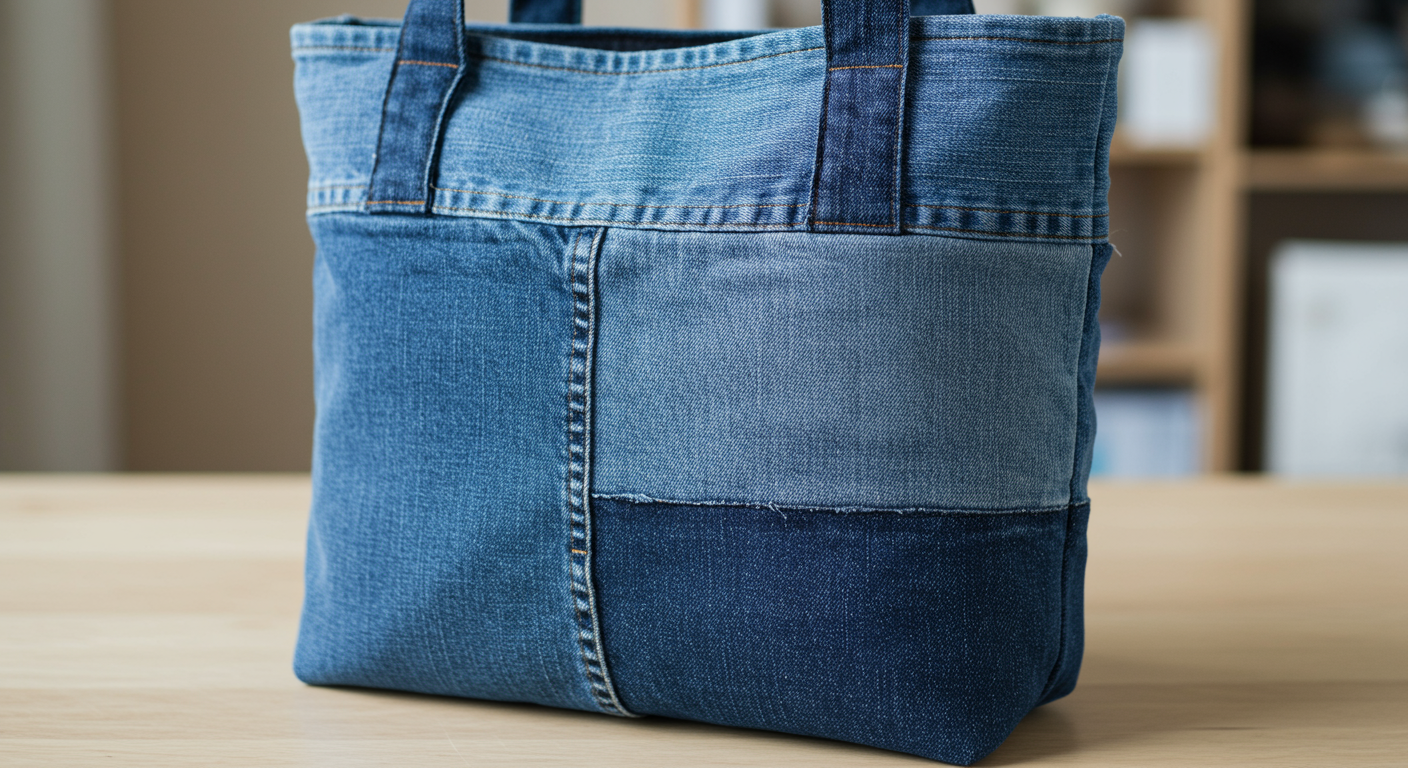
Do you have a pile of old jeans sitting in your closet, unworn and forgotten? Instead of tossing them out, why not give them a new life by upcycling them into something useful and stylish? In this blog post, we’ll guide you through the process of transforming your old denim into a chic and durable tote bag. This is a fantastic DIY project that’s both eco-friendly and creatively rewarding. Let’s dive in and learn how to sew a tote bag from old jeans!
Why Upcycle Denim?
Upcycling is the process of transforming waste materials into new products of better quality or environmental value. Denim, being a durable and versatile fabric, is perfect for upcycling. By repurposing your old jeans, you’re not only reducing textile waste but also creating a unique and personalized item that reflects your style.
Benefits of Making Your Own Tote Bag:
- Eco-Friendly: Reduces textile waste and promotes sustainable living.
- Cost-Effective: Saves money compared to buying a new tote bag.
- Customizable: Allows you to create a bag that perfectly suits your needs and style.
- Unique: Ensures you have a one-of-a-kind accessory.
- Therapeutic: Provides a relaxing and fulfilling crafting experience.
Materials and Tools You’ll Need
Before you start, gather the following materials and tools:
Materials:
- Old Jeans: At least one pair of jeans, depending on the size of the tote bag you want to make.
- Lining Fabric (Optional): Cotton, canvas, or any fabric of your choice for the lining. This adds durability and a finished look.
- Thread: Matching or contrasting thread for sewing.
- Interfacing (Optional): Adds structure and stiffness to the bag.
- Buttons, Rivets, or Decorative Patches (Optional): For embellishing your tote bag.
Tools:
- Sewing Machine: A sewing machine will make the process faster and easier, but you can also sew by hand.
- Scissors: For cutting fabric.
- Seam Ripper: For removing unwanted seams.
- Pins or Clips: For holding fabric together while sewing.
- Measuring Tape or Ruler: For accurate measurements.
- Iron and Ironing Board: For pressing fabric.
- Marker or Fabric Chalk: For marking cutting lines.

Step-by-Step Guide: Sewing Your Denim Tote Bag
Follow these steps to create your stylish denim tote bag:
Step 1: Prepare Your Denim
1.1: Wash and dry your old jeans. This will ensure that the fabric doesn’t shrink after you’ve sewn your bag.
1.2: Use a seam ripper to take apart the jeans along the seams. This will give you larger pieces of fabric to work with.
1.3: Iron the denim pieces to remove any wrinkles and creases.
Step 2: Cut Out the Tote Bag Pieces
2.1: Decide on the size of your tote bag. A common size is around 14 inches wide and 16 inches tall, but you can adjust the dimensions to your liking.
2.2: Cut out two rectangular pieces of denim for the main body of the bag. For example, if you want a 14×16 inch bag, cut two pieces that are 15×17 inches to allow for seam allowances.
2.3: If using a lining, cut out two rectangular pieces of lining fabric that are the same size as the denim pieces.
2.4: Cut out two strips of denim for the handles. These should be about 2-3 inches wide and 24-28 inches long, depending on your preferred handle length.
Step 3: Sew the Tote Bag Body
3.1: Place the two denim pieces right sides together (the sides you want to be on the outside of the bag should be facing each other).
3.2: Pin or clip the sides and bottom of the denim pieces together.
3.3: Sew along the pinned edges with a ½ inch seam allowance, leaving the top open. Backstitch at the beginning and end of each seam to secure the stitches.
3.4: Repeat the process with the lining fabric, leaving a 4-6 inch opening at the bottom for turning the bag right side out later.
Step 4: Attach the Lining
4.1: Place the denim bag inside the lining bag, with right sides facing each other. The top edges of the denim and lining should align.
4.2: Pin or clip around the top edge of the bag.
4.3: Sew around the top edge with a ½ inch seam allowance.
Step 5: Turn and Finish the Bag
5.1: Reach through the opening in the bottom of the lining and pull the entire bag right side out.
5.2: Press the top edge of the bag with an iron to create a crisp, clean finish.
5.3: Fold the edges of the opening in the lining inward by ½ inch and press with an iron.
5.4: Sew the opening in the lining closed using a machine or hand stitch.
5.5: Push the lining down into the denim bag.
5.6: Press the top edge of the bag again to ensure a smooth finish.
Step 6: Create and Attach the Handles
6.1: Fold each handle strip in half lengthwise, with wrong sides together, and press with an iron.
6.2: Open the strip and fold each long edge towards the center crease, then press again.
6.3: Fold the strip in half again along the original center crease, and press. This will create a neat, finished edge for your handles.
6.4: Sew along all four edges of each handle strip to secure the folds.
6.5: Pin the handles to the top of the bag, positioning them evenly on each side. Reinforce the handle attachment points by creating an X-shape within a box.
Step 7: Add Embellishments (Optional)
7.1: Get creative and personalize your tote bag with buttons, rivets, patches, or embroidery. Use leftover denim scraps to create unique appliques.
No products found.
Tips and Tricks for a Perfect Denim Tote Bag
Here are some helpful tips to ensure your denim tote bag turns out beautifully:
- Choose the Right Denim: Thicker denim will create a more durable bag, while thinner denim is easier to sew.
- Use a Heavy-Duty Needle: When sewing through multiple layers of denim, use a heavy-duty needle in your sewing machine to prevent breakage.
- Reinforce Seams: Denim can be prone to fraying, so reinforce your seams by backstitching or using a zigzag stitch along the edges.
- Press as You Go: Ironing each seam as you sew will give your tote bag a professional finish.
- Consider Adding Pockets: You can easily add pockets to the inside or outside of your tote bag using leftover denim scraps.
- Get Creative with Embellishments: Don’t be afraid to experiment with different embellishments to create a truly unique tote bag. Consider using the pockets from the jeans as functional pockets on the bag!
Conclusion: Enjoy Your Upcycled Denim Tote Bag!
Congratulations! You’ve successfully upcycled your old jeans into a stylish and functional tote bag. This DIY project is not only a great way to reduce waste but also a fun and rewarding creative outlet. Now you can proudly carry your handmade tote bag knowing that you’ve contributed to a more sustainable lifestyle.
So, gather your old jeans, dust off your sewing machine, and get started on your own upcycled denim tote bag today! Share your creations with us in the comments below – we’d love to see what you come up with!
Happy Sewing!
No products found.
Related Posts


Previous Post
Next Post

- Air Fryer Revolution: Your Guide to Crispy, Healthy & Fast Cooking

- AirPods: A Comprehensive Guide to Apple’s Wireless Earbuds
- Amazon Echo Dot: A Comprehensive Guide to Smart Home Automation
- Amazon Fire Stick: Your Ultimate Guide to Streaming Entertainment
- Apple TV: Your Comprehensive Guide to Streaming Bliss in 2024
- Apple Watch SE: The Smart Choice for a Smarter Lifestyle
- Apple Watch Series 9: A Deep Dive into the Latest Features and Innovations
- Apple Watch Ultra 2: A Deep Dive into the Ultimate Adventure Companion
- Apple Watch Ultra: The Ultimate Adventure Companion – A Deep Dive Review
- Apple Watch: A Comprehensive Guide to Features, Benefits, and Choosing the Right Model


