Now Reading: DIY Idea: Attract Birds to Your Garden with DIY Bird Feeders – Easy Pine Cone Bird Feeder Tutorial
- 01
DIY Idea: Attract Birds to Your Garden with DIY Bird Feeders – Easy Pine Cone Bird Feeder Tutorial
DIY Idea: Attract Birds to Your Garden with DIY Bird Feeders – Easy Pine Cone Bird Feeder Tutorial
Introduction: Welcome Wildlife to Your Backyard
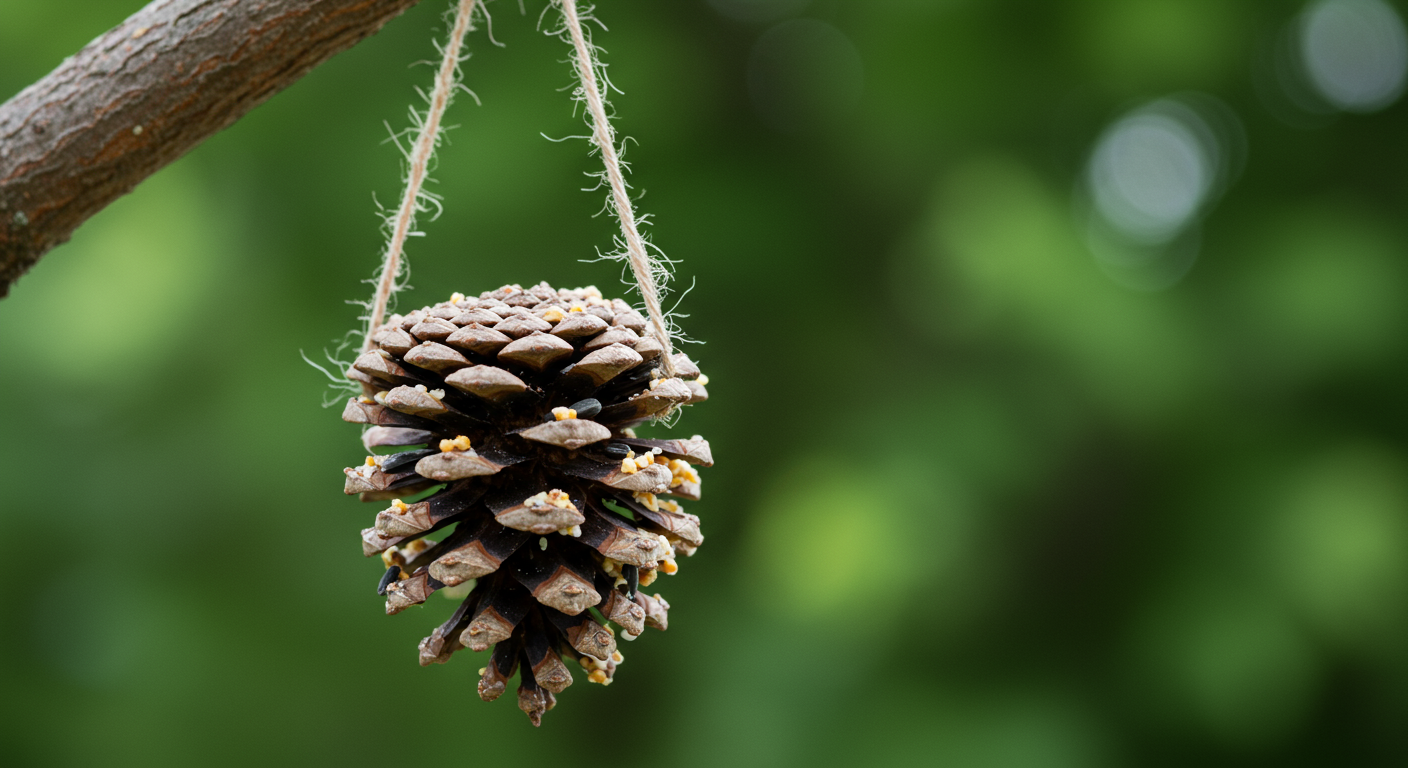
Are you looking for a simple yet rewarding way to connect with nature and beautify your garden? Attracting birds is not only a delightful experience but also beneficial for your local ecosystem. Birds help control insect populations, pollinate flowers, and simply add vibrancy to your outdoor space. One of the easiest and most cost-effective methods to bring these feathered friends closer is by creating your own DIY bird feeders. In this tutorial, we will focus on crafting a charming and eco-friendly pine cone bird feeder. This project is perfect for families, nature enthusiasts, and anyone looking to add a touch of whimsy to their garden. So, let’s get started and learn how to transform a simple pine cone into a bird-friendly haven!
Why Pine Cone Bird Feeders?
Pine cone bird feeders are an excellent choice for several reasons:
1. Cost-Effective and Eco-Friendly: Pine cones are readily available in many areas, especially after the fall season. They are a natural, biodegradable material, making them an environmentally conscious choice for attracting birds.
2. Simple and Fun to Make: This project is straightforward and requires minimal supplies, making it perfect for crafters of all ages. It’s a fantastic way to involve children in learning about nature and fostering a love for the outdoors.
3. Attracts a Variety of Birds: When filled with the right type of birdseed, pine cone feeders can attract a wide variety of bird species, from chickadees and finches to nuthatches and woodpeckers. It allows you to observe diverse bird behaviors right from your window.
4. Year-Round Appeal: While pine cones are often associated with autumn and winter, they can be used as bird feeders throughout the year, providing a consistent food source for birds regardless of the season.
5. Rustic Charm: Pine cone bird feeders add a touch of rustic charm to your garden or outdoor space. They blend seamlessly with natural surroundings, creating a visually appealing and inviting environment for both birds and people.
Materials You’ll Need
Before you begin, gather the following materials:
1. Pine Cones: Look for large, open pine cones. Clean them gently, if needed, to remove any dirt or debris. Ensure they are completely dry before starting the project. The number of pine cones depends on how many feeders you want to make.
2. Birdseed: Choose a birdseed mix that is suitable for the birds in your area. Black oil sunflower seeds are a popular and versatile option that attracts a wide variety of species. You can also use a mix of seeds and nuts.
3. Peanut Butter (or alternative): Use smooth peanut butter (make sure it is free from Xylitol which is toxic to dogs and birds). This acts as the adhesive to hold the birdseed in place. If you have peanut allergies in your household or prefer an alternative, you can use lard, vegetable shortening, or a commercially available suet binder. Ensure the alternative is safe for birds.
4. Twine, String, or Ribbon: This will be used to hang your bird feeders. Choose a natural fiber twine or string for an eco-friendly option. Ensure it is strong enough to hold the weight of the pine cone once filled with birdseed.
5. Butter Knife or Spreader: This will help you apply the peanut butter evenly to the pine cone.
6. Shallow Dish or Tray: This is for rolling the pine cone in the birdseed.
7. Optional: Decorations: You can add other natural embellishments like berries or small pieces of fruit for extra appeal.
No products found.
Step-by-Step Tutorial: Creating Your Pine Cone Bird Feeder
Now that you have all your materials, let’s start building your DIY pine cone bird feeder!
Step 1: Prepare the Pine Cone: Inspect your pine cone for any remaining debris or insects. If necessary, gently clean it with a brush.
Step 2: Attach the Hanger: Cut a length of twine or string (approximately 12-18 inches). Tie one end securely around the top of the pine cone, creating a loop for hanging. Ensure the knot is tight and secure. Test the strength of the hanger before proceeding.
Step 3: Apply the Peanut Butter: Using your butter knife or spreader, evenly coat the entire surface of the pine cone with peanut butter. Be sure to get the peanut butter into all the crevices and scales of the pine cone. This will provide a good surface for the birdseed to adhere to.
Step 4: Roll in Birdseed: Pour your birdseed into the shallow dish or tray. Roll the peanut butter-covered pine cone in the birdseed, pressing gently to ensure the seeds stick to the peanut butter. Coat the entire surface of the pine cone generously with birdseed.
Step 5: Let it Set: Place the completed pine cone bird feeder on a piece of wax paper or parchment paper and allow the peanut butter to set for a few minutes. This will help the birdseed adhere more firmly.
Step 6: Hang and Enjoy: Find a suitable spot in your garden or outdoor space to hang your new bird feeder. Choose a location that is easily visible from a window, so you can enjoy watching the birds that come to visit. Ensure the feeder is hung securely from a branch or hook.
Tips for Success:
*Use fresh birdseed for best results.
* Avoid using salted peanut butter, as salt can be harmful to birds.
* Regularly replenish the birdseed to keep your feeder attractive to birds.
* Place the feeder in a location that is protected from strong winds and direct sunlight.
* Consider adding a small dish of water nearby to provide birds with a source of hydration.
Maintaining Your Bird Feeder and Attracting More Birds
Once your pine cone bird feeder is hanging and attracting feathered friends, it’s important to maintain it properly and take steps to attract even more birds to your garden.
1. Regular Cleaning: Clean your bird feeder regularly (at least once a month) to prevent the spread of disease. Remove any old or uneaten birdseed and wash the pine cone with warm, soapy water. Rinse thoroughly and allow it to dry completely before refilling. A clean feeder is a healthy feeder!
2. Choosing the Right Birdseed: Different bird species prefer different types of birdseed. Experiment with various seed mixes to see what attracts the most birds in your area. Black oil sunflower seeds are a good all-around choice, while nyjer seeds are a favorite of finches. Consider offering a variety of seed types to cater to different bird preferences.
3. Providing Water: In addition to food, birds need a reliable source of fresh water. A birdbath or shallow dish of water can be a welcome addition to your garden, especially during hot or dry weather. Make sure to clean the water source regularly to prevent the growth of algae and bacteria.
4. Creating a Bird-Friendly Habitat: Plant native trees, shrubs, and flowers that provide food and shelter for birds. Consider adding nesting boxes or birdhouses to encourage birds to breed in your garden. Creating a diverse and natural habitat will make your garden more attractive to a wide variety of bird species.
5. Protecting Birds from Predators: Keep your cats indoors or supervise them closely when they are outside to prevent them from hunting birds. Place bird feeders in locations that are not easily accessible to cats and other predators. Consider using bird-safe netting to protect your garden from unwanted visitors.
No products found.
Related Posts


Previous Post
Next Post


- Air Fryer Revolution: Your Guide to Crispy, Healthy & Fast Cooking

- AirPods: A Comprehensive Guide to Apple’s Wireless Earbuds
- Amazon Echo Dot: A Comprehensive Guide to Smart Home Automation
- Amazon Fire Stick: Your Ultimate Guide to Streaming Entertainment
- Apple TV: Your Comprehensive Guide to Streaming Bliss in 2024
- Apple Watch SE: The Smart Choice for a Smarter Lifestyle
- Apple Watch Series 9: A Deep Dive into the Latest Features and Innovations
- Apple Watch Ultra 2: A Deep Dive into the Ultimate Adventure Companion
- Apple Watch Ultra: The Ultimate Adventure Companion – A Deep Dive Review
- Apple Watch: A Comprehensive Guide to Features, Benefits, and Choosing the Right Model


