Now Reading: DIY Idea: Create Personalized Bottle Cap Magnets – Upcycle & Decorate!
- 01
DIY Idea: Create Personalized Bottle Cap Magnets – Upcycle & Decorate!
DIY Idea: Create Personalized Bottle Cap Magnets – Upcycle & Decorate!
Introduction: Turning Trash into Treasure – The Bottle Cap Magnet Revolution!
Are you looking for a creative and eco-friendly DIY project? Look no further! In this blog post, we’ll guide you through the simple and satisfying process of creating personalized magnets from recycled bottle caps. This is not only a fantastic way to upcycle materials that would otherwise end up in the landfill, but also a fun and budget-friendly way to add a personal touch to your home decor or create unique gifts for friends and family.
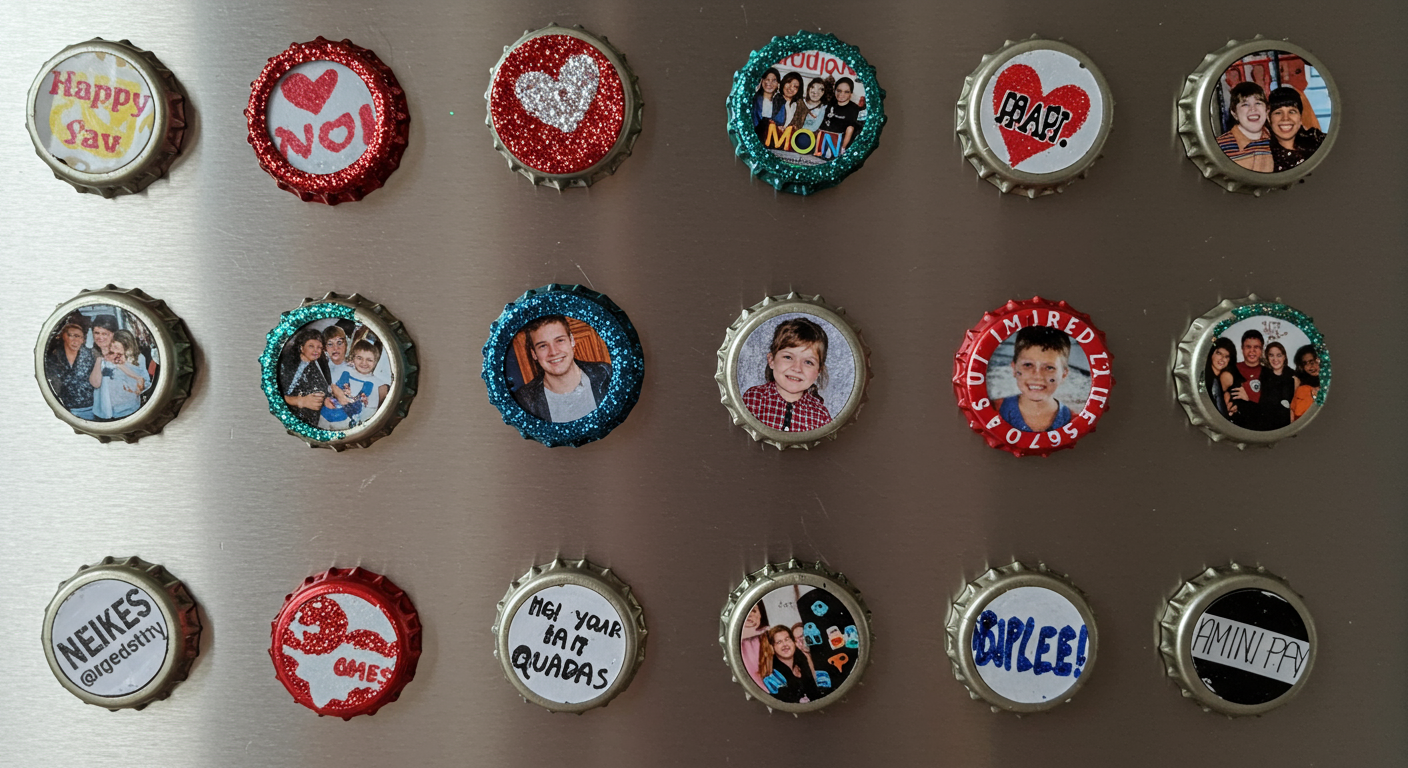
Bottle cap magnets are incredibly versatile. You can customize them with photos, paint, glitter, fabric scraps, or even small decorative elements. They’re perfect for holding notes on your refrigerator, adding a whimsical touch to your office whiteboard, or even as party favors or stocking stuffers.
So, gather your bottle caps, unleash your creativity, and let’s dive into the world of DIY bottle cap magnets!
Materials and Tools: What You’ll Need to Get Started
Before you begin your bottle cap magnet adventure, let’s gather the necessary materials and tools. The great thing about this project is that it requires minimal investment and utilizes readily available items.
Here’s a comprehensive list:
- Bottle Caps: The star of the show! Collect as many as you can. Make sure they are clean and dry before you start. A variety of sizes and colors can add visual interest.
- Magnets: Small, strong magnets are essential. Ceramic magnets or neodymium magnets work best. Neodymium magnets are smaller and stronger, allowing for a cleaner look. You can find these at most craft stores or online retailers.
- Strong Adhesive: Choose a strong adhesive that will securely bond the magnets to the bottle caps. Hot glue is a popular option for its quick drying time, but epoxy or super glue can provide a more permanent bond. Consider using E6000 adhesive for long-lasting strength.
- Decorative Elements: This is where your creativity shines! Consider using:
- Photos: Print small photos to fit inside the bottle caps.
- Paper: Scrapbook paper, decorative paper, or even magazine clippings can add texture and color.
- Paint: Acrylic paints are perfect for adding vibrant colors and designs.
- Glitter: For a touch of sparkle and glam!
- Fabric Scraps: Small pieces of fabric can add texture and visual interest.
- Small Embellishments: Buttons, beads, sequins, or other small decorative items.
- Tools:
- Scissors or Craft Knife: For cutting paper or fabric to size.
- Paintbrushes: For applying paint or glue.
- Pencil: For tracing and marking.
- Ruler: For accurate measurements.
- Hot Glue Gun (optional): If using hot glue.
- Protective Sealer (optional): Mod Podge or clear acrylic spray can protect your designs and add a glossy finish.
Pro Tip: Before starting a large batch, test your chosen adhesive and decorative elements on a few bottle caps to ensure they bond well and achieve the desired look.

Step-by-Step Guide: Crafting Your Personalized Bottle Cap Magnets
Now that you have all your materials and tools ready, let’s get down to the fun part – creating your personalized bottle cap magnets!
Step 1: Prepare the Bottle Caps
Start by thoroughly cleaning your bottle caps with soap and water. Remove any dirt or residue and allow them to dry completely. If the bottle caps are dented or scratched, you can gently smooth them out with pliers or a small hammer. This step ensures a clean and smooth surface for your decorations.
Step 2: Design and Decorate
This is where your creativity takes center stage! Choose your desired decorative elements and begin applying them to the inside of the bottle caps. Here are a few ideas:
- Photos: Trace the inside of the bottle cap onto your photo and cut out the circle. Glue the photo inside the bottle cap, ensuring it’s centered and smooth.
- Paper: Cut out circles of decorative paper or scrapbook paper to fit inside the bottle caps. Glue them in place, smoothing out any wrinkles or bubbles.
- Paint: Paint the inside of the bottle caps with acrylic paint. You can create simple designs, patterns, or even miniature landscapes. Allow the paint to dry completely before moving on to the next step.
- Glitter: Apply a thin layer of glue to the inside of the bottle cap and sprinkle glitter over it. Shake off any excess glitter and allow the glue to dry completely.
- Fabric Scraps: Cut out small circles of fabric and glue them inside the bottle caps. You can add buttons, beads, or other embellishments on top of the fabric for added texture and visual interest.
Step 3: Seal and Protect (Optional)
If you’re using photos, paper, or glitter, consider sealing the design with Mod Podge or a clear acrylic spray. This will protect the design from moisture and wear and tear. Apply a thin layer of Mod Podge with a paintbrush or spray a light coat of acrylic sealer. Allow the sealer to dry completely before moving on to the next step.
Step 4: Attach the Magnets
Now it’s time to attach the magnets to the back of the bottle caps. Apply a generous amount of your chosen adhesive to the back of the magnet. Press the magnet firmly onto the center of the bottle cap and hold it in place for a few seconds until the adhesive begins to set. Repeat this process for all your bottle caps.
Step 5: Allow to Dry Completely
Allow the adhesive to dry completely before using your new bottle cap magnets. The drying time will vary depending on the type of adhesive you use. Refer to the manufacturer’s instructions for the recommended drying time. It’s best to let them dry undisturbed overnight to ensure a strong bond.
Step 6: Enjoy Your Personalized Magnets!
Congratulations! You’ve successfully created personalized bottle cap magnets. Now you can use them to decorate your refrigerator, whiteboard, or any other magnetic surface. They also make fantastic gifts for friends and family.
No products found.
Creative Ideas and Variations: Level Up Your Bottle Cap Magnet Game
Want to take your bottle cap magnet creations to the next level? Here are some creative ideas and variations to inspire you:
- Themed Magnets: Create magnets based on a specific theme, such as holidays, seasons, or hobbies. For example, you could make Christmas-themed magnets with miniature ornaments or Halloween-themed magnets with spooky images.
- Initial Magnets: Personalize magnets with initials or monograms. Paint the initials on the inside of the bottle caps or use letter beads to create a unique and personalized touch.
- Word Magnets: Create magnets with individual letters to spell out words or phrases. This is a fun and interactive way to leave messages on your refrigerator or whiteboard. You can use scrabble tiles or letter beads for this.
- Bottle Cap Puzzles: Cut a picture into small pieces and glue each piece onto a separate bottle cap magnet. Arrange the magnets on a magnetic surface to complete the puzzle.
- Bottle Cap Jewelry: Turn bottle caps into pendants, earrings, or bracelets. Drill a small hole in the top of the bottle cap and attach a jump ring or chain. Decorate the bottle cap as desired and wear your unique creation with pride.
- Resin Coated Magnets: Use clear epoxy resin to coat the inside of the bottle cap after decorating it. This gives it a professional, glossy finish and makes it more durable.
Conclusion: Upcycling with Style – Your Bottle Cap Magnet Masterpiece
Creating personalized bottle cap magnets is a rewarding and eco-friendly DIY project that allows you to express your creativity and add a personal touch to your home decor. By upcycling discarded bottle caps, you’re not only reducing waste but also creating unique and functional pieces of art.
Whether you’re making magnets for yourself or as gifts, the possibilities are endless. So, gather your materials, unleash your imagination, and start crafting your own bottle cap magnet masterpieces today! Remember to experiment with different techniques, colors, and embellishments to create truly unique and personalized designs. Have fun!
Happy crafting!
No products found.
Related Posts


Previous Post
Next Post

- Air Fryer Revolution: Your Guide to Crispy, Healthy & Fast Cooking

- AirPods: A Comprehensive Guide to Apple’s Wireless Earbuds
- Amazon Echo Dot: A Comprehensive Guide to Smart Home Automation
- Amazon Fire Stick: Your Ultimate Guide to Streaming Entertainment
- Apple TV: Your Comprehensive Guide to Streaming Bliss in 2024
- Apple Watch SE: The Smart Choice for a Smarter Lifestyle
- Apple Watch Series 9: A Deep Dive into the Latest Features and Innovations
- Apple Watch Ultra 2: A Deep Dive into the Ultimate Adventure Companion
- Apple Watch Ultra: The Ultimate Adventure Companion – A Deep Dive Review
- Apple Watch: A Comprehensive Guide to Features, Benefits, and Choosing the Right Model


