Now Reading: DIY Idea: Design Your Own Colorful Bath Bombs – Easy Recipes & Tips!
- 01
DIY Idea: Design Your Own Colorful Bath Bombs – Easy Recipes & Tips!
DIY Idea: Design Your Own Colorful Bath Bombs – Easy Recipes & Tips!
Why Make Your Own Bath Bombs?
Bath bombs are a fantastic way to elevate your bathing experience. They fizz, they foam, and they release delightful fragrances and skin-loving ingredients into the water. But store-bought bath bombs can be expensive and often contain artificial ingredients. That’s where DIY bath bombs come in! Making your own allows you to control exactly what goes into them, customize the scents and colors to your liking, and save money in the process. Plus, it’s a fun and rewarding project!
With homemade bath bombs, you can tailor the ingredients to address specific skin concerns. Do you have dry skin? Add extra oils and butters. Are you sensitive to certain fragrances? Choose your essential oils carefully. Making your own bath bombs puts you in complete control, allowing you to create a truly personalized and luxurious bathing experience.
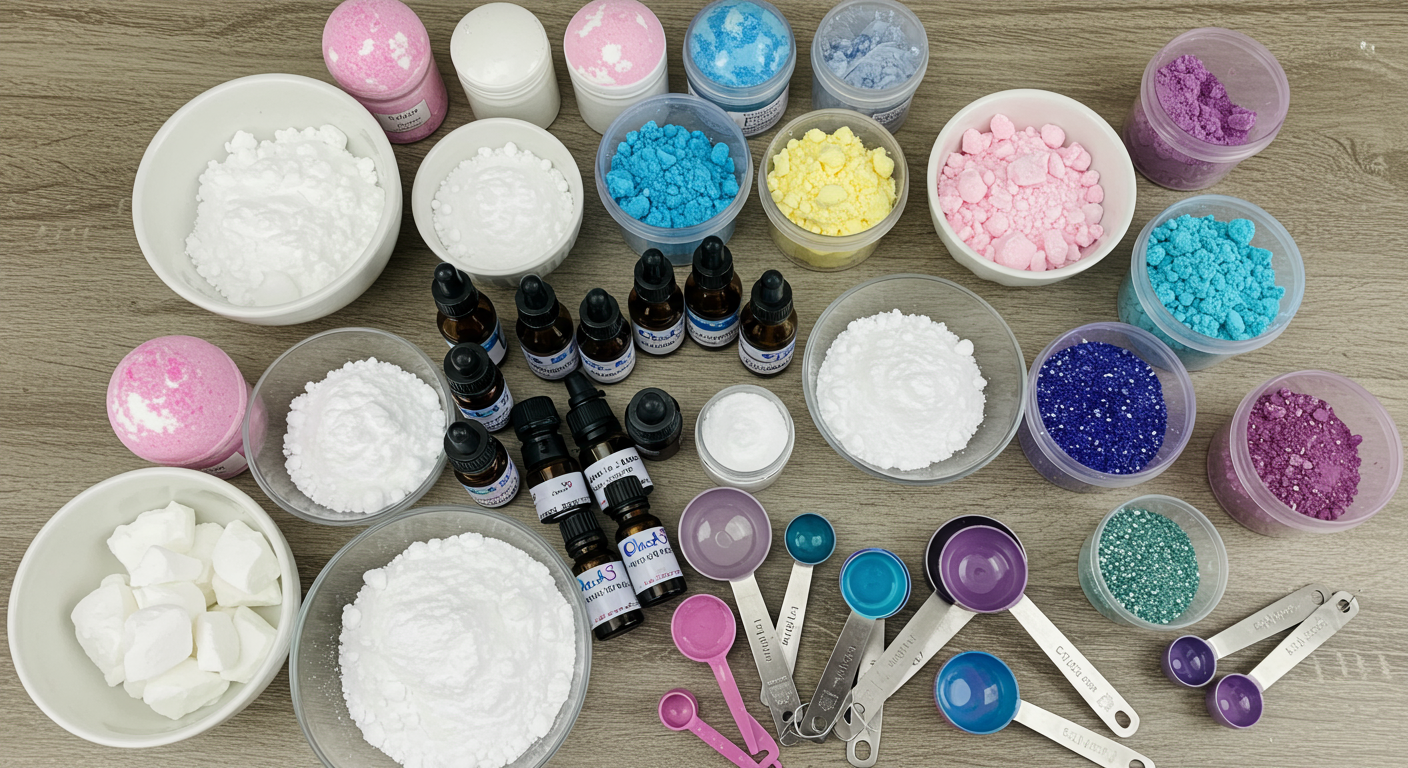
Basic Bath Bomb Ingredients: What You’ll Need
Before we dive into specific recipes, let’s cover the essential ingredients you’ll need to create your own bath bombs:
- Baking Soda (Sodium Bicarbonate): The base of your bath bomb. It helps create the fizz.
- Citric Acid: Reacts with baking soda to create the fizzy action. Make sure to use anhydrous citric acid (contains very little to no water).
- Epsom Salt: Helps soothe muscles and relieve stress.
- Cornstarch: Acts as a binder and helps create a smoother bath bomb.
- Oil: Adds moisture to the bath and helps bind the ingredients together. Good choices include coconut oil, sweet almond oil, or jojoba oil.
- Water or Witch Hazel: A small amount of liquid is needed to activate the fizzing reaction. Use sparingly to prevent premature fizzing. Witch hazel is generally preferred as it contains alcohol and dries faster, allowing the bath bombs to set firmly.
- Essential Oils: For fragrance and aromatherapy benefits. Lavender, chamomile, eucalyptus, and peppermint are popular choices.
- Colorant: Mica powder, cosmetic-grade dyes, or natural colorants like beet root powder or spirulina powder can be used to add color.
- Optional Add-ins: Dried flowers, herbs, glitter, or small toys can be added for extra flair.
Safety First! Always use cosmetic-grade ingredients when making bath bombs. Avoid using food coloring, as it can stain your tub. Wear gloves to protect your hands from the citric acid and dyes.

Colorful Bath Bomb Recipes: Unleash Your Creativity!
Here are a few recipes to get you started. Feel free to experiment with different scents, colors, and add-ins to create your own unique bath bomb creations!
Recipe 1: Relaxing Lavender Bath Bomb
- 1 cup Baking Soda
- 1/2 cup Citric Acid
- 1/2 cup Epsom Salt
- 1/4 cup Cornstarch
- 2 tablespoons Coconut Oil (melted)
- 1 teaspoon Water or Witch Hazel
- 20 drops Lavender Essential Oil
- Purple Mica Powder
- Dried Lavender Buds (optional)
Recipe 2: Energizing Citrus Bath Bomb
- 1 cup Baking Soda
- 1/2 cup Citric Acid
- 1/2 cup Epsom Salt
- 1/4 cup Cornstarch
- 2 tablespoons Sweet Almond Oil
- 1 teaspoon Water or Witch Hazel
- 10 drops Orange Essential Oil
- 10 drops Lemon Essential Oil
- Yellow and Orange Mica Powder
- Dried Orange Peel Zest (optional)
Recipe 3: Calming Oatmeal Milk & Honey Bath Bomb
- 1 cup Baking Soda
- 1/2 cup Citric Acid
- 1/2 cup Epsom Salt
- 1/4 cup Cornstarch
- 2 tablespoons Jojoba Oil
- 1 teaspoon Water or Witch Hazel
- 10 drops Honey Essential Oil (or fragrance oil)
- 2 tablespoons Powdered Milk
- 1 tablespoons Colloidal Oatmeal
- Gold Mica Powder
Instructions for All Recipes:
- In a large bowl, whisk together the baking soda, citric acid, Epsom salt, and cornstarch.
- In a separate bowl, combine the melted coconut oil (or other oil), water or witch hazel, essential oils, and colorant.
- Slowly add the wet ingredients to the dry ingredients, mixing constantly with your hands. The mixture should feel like damp sand. Be careful not to add too much liquid at once, as this will activate the fizzing reaction prematurely.
- If adding dried flowers or other add-ins, gently fold them into the mixture.
- Pack the mixture tightly into bath bomb molds. You can use metal molds, plastic molds, or even silicone molds.
- Let the bath bombs dry for at least 24 hours, or until they are hard and solid.
- Gently remove the bath bombs from the molds.
- Store in an airtight container in a cool, dry place.
No products found.
Tips for Perfect Bath Bombs
Making bath bombs can be tricky, but with these tips, you’ll be creating perfect bath bombs in no time!
- Humidity is Your Enemy: Work in a dry environment. Humidity can cause the bath bombs to fizz prematurely or crumble.
- Don’t Over-Wet the Mixture: Adding too much liquid is the most common mistake. Add the liquid slowly and mix thoroughly.
- Pack Tightly: Pack the mixture firmly into the molds to ensure they hold their shape.
- Be Patient: Allow the bath bombs to dry completely before removing them from the molds. This may take up to 48 hours in humid environments.
- Troubleshooting: If your bath bombs are crumbling, you may need to add a little more oil. If they are fizzing prematurely, you may have added too much liquid.
- Experiment! Don’t be afraid to try different combinations of scents, colors, and add-ins. That’s the fun of making your own bath bombs!
Beyond the Basics: Advanced Bath Bomb Techniques
Once you’ve mastered the basic bath bomb recipe, you can explore more advanced techniques to create truly stunning bath bombs.
- Layering Colors: Create multi-colored bath bombs by layering different colored mixtures in the molds.
- Embeds: Add small embeds, such as bath salts, small toys, or even soap pieces, into the center of the bath bomb for a fun surprise.
- Piping: Use a piping bag to create decorative designs on top of your bath bombs.
- Painting: Paint designs onto your bath bombs using cosmetic-grade paint.
- Bath Bomb Doughnuts: Make your bath bombs in doughnut molds and add “frosting” using whipped soap or bath bomb mixture.
The possibilities are endless! Let your creativity run wild and create bath bombs that are as beautiful as they are relaxing.
No products found.
Related Posts


Previous Post
Next Post


- Air Fryer Revolution: Your Guide to Crispy, Healthy & Fast Cooking

- AirPods: A Comprehensive Guide to Apple’s Wireless Earbuds
- Amazon Echo Dot: A Comprehensive Guide to Smart Home Automation
- Amazon Fire Stick: Your Ultimate Guide to Streaming Entertainment
- Apple TV: Your Comprehensive Guide to Streaming Bliss in 2024
- Apple Watch SE: The Smart Choice for a Smarter Lifestyle
- Apple Watch Series 9: A Deep Dive into the Latest Features and Innovations
- Apple Watch Ultra 2: A Deep Dive into the Ultimate Adventure Companion
- Apple Watch Ultra: The Ultimate Adventure Companion – A Deep Dive Review
- Apple Watch: A Comprehensive Guide to Features, Benefits, and Choosing the Right Model


