Now Reading: DIY Idea: Make Educational Crafts with Sensory Bottles – Creating Sensory Bottles with Glitter and Liquids
- 01
DIY Idea: Make Educational Crafts with Sensory Bottles – Creating Sensory Bottles with Glitter and Liquids
DIY Idea: Make Educational Crafts with Sensory Bottles – Creating Sensory Bottles with Glitter and Liquids
What are Sensory Bottles and Why are They Educational?
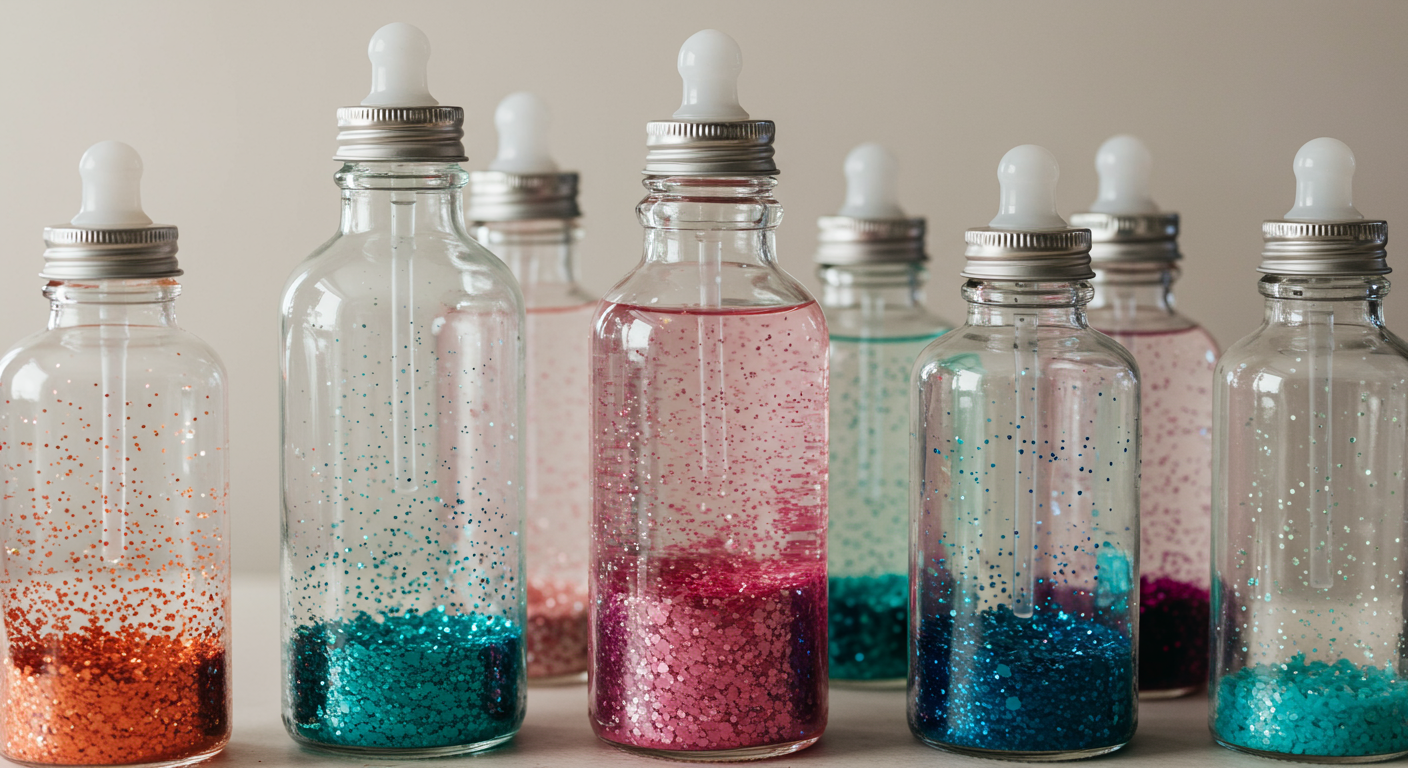
Sensory bottles, also known as calm-down jars or discovery bottles, are translucent containers filled with liquids and various objects that create mesmerizing visual effects when shaken or turned. They are fantastic tools for sensory exploration, promoting calmness, and enhancing focus. Beyond simple entertainment, sensory bottles offer significant educational benefits:
Sensory Development: They stimulate visual tracking, tactile exploration (if eventually opened under supervision), and auditory awareness (depending on the materials inside).
Emotional Regulation: The swirling glitter and slow-moving objects can be incredibly soothing, helping children manage feelings of anxiety, frustration, or overstimulation.
Scientific Exploration: They introduce basic concepts of density, viscosity, and the properties of different materials in a fun and accessible way.
Language Development: Describing what they see inside the bottle helps children build their vocabulary and descriptive language skills.
Creativity and Imagination: Sensory bottles can spark imaginative play and storytelling.
Materials You’ll Need to Create Your Educational Sensory Bottles
Getting started with sensory bottles is easy! Here’s a comprehensive list of materials you’ll need:
Bottles: Plastic bottles are the safest option, especially for younger children. Choose clear, sturdy bottles with wide mouths for easy filling. Empty water bottles, juice bottles, or even recycled condiment bottles work well. Make sure they are thoroughly cleaned and dried.
Liquids:
- Water: A basic and readily available option.
- Clear Glue or Glycerin: These thicken the water, slowing down the movement of objects and creating a more captivating visual effect. Start with a small amount and add more to achieve the desired viscosity. You can find glycerin at most pharmacies or online retailers.
- Baby Oil or Mineral Oil: These create a distinct layering effect when combined with water, as they don’t mix. They also add a unique visual dimension.
Glitter: Fine glitter is essential for that mesmerizing swirling effect. Choose different colors, sizes, and types (e.g., holographic, iridescent) to create a variety of visual experiences. Extra fine glitter tends to suspend better than larger, chunkier glitter.
Small Objects: This is where you can get creative and tailor the bottle to specific educational themes. Here are some ideas:
- Beads: Different sizes, shapes, and colors.
- Sequins: Stars, hearts, circles, etc.
- Buttons: Various shapes and sizes.
- Small Toys: Tiny plastic animals, figurines, or themed charms.
- Pom-poms: Add texture and color.
- Confetti: Holiday-themed or colorful confetti.
- Sand or Small Pebbles: Introduce a natural element.
- Food Coloring: To tint the liquid for added visual appeal.
Glue or Hot Glue Gun: To seal the lid tightly and prevent leaks. Hot glue is recommended for a more permanent seal, but use caution and supervise children closely if using it.

Step-by-Step Guide: Creating Your Educational Sensory Bottles
Now it’s time to put everything together! Follow these simple steps to create your own educational sensory bottles:
- Prepare the Bottle: Ensure the bottle is clean, dry, and ready to be filled. Remove any labels or residue.
- Add the Liquid Base: Start by filling the bottle about halfway with your chosen liquid (water, glue mixture, or oil).
- Add Glitter and Objects: Sprinkle in a generous amount of glitter and add your chosen small objects. Consider the educational theme you want to create. For example, a bottle with alphabet beads could be used for letter recognition.
- Top it Off: Fill the remaining space in the bottle with more liquid, leaving a small air gap at the top. This allows the contents to move freely.
- Adjust Consistency: If using a glue or glycerin mixture, test the consistency by shaking the bottle. Add more glue or glycerin if you want the objects to move more slowly. Add more water if you want them to move faster.
- Seal the Lid: Securely attach the lid to the bottle. For extra security, apply a line of glue (hot glue is best) around the edge of the lid to prevent leaks. Allow the glue to dry completely before allowing children to play with the bottle.
- Test and Enjoy: Shake the bottle and observe the swirling effects. Let children explore the bottle under supervision.
No products found.
Educational Themes and Variations for Your Sensory Bottles
The possibilities for educational sensory bottle themes are endless! Here are some ideas to get you started:
Alphabet Bottle: Fill the bottle with alphabet beads or small letter tiles. Use it to practice letter recognition, spelling, and early literacy skills. Ask children to find specific letters or spell simple words.
Number Bottle: Fill the bottle with number beads or small number toys. Use it to practice number recognition, counting, and basic math skills. Ask children to count the number of objects of a certain color.
Color Recognition Bottle: Fill the bottle with objects of different colors. Use it to practice color recognition and sorting skills. Ask children to identify specific colors or find all the objects of a particular color.
Shape Recognition Bottle: Fill the bottle with objects of different shapes. Use it to practice shape recognition and geometric concepts. Ask children to identify squares, circles, triangles, etc.
Ocean Theme Bottle: Fill the bottle with blue-tinted water, glitter, small plastic sea creatures, and shells. Use it to learn about ocean animals and marine environments.
Space Theme Bottle: Fill the bottle with dark blue or black-tinted water, glitter, small plastic stars, planets, and astronauts. Use it to learn about the solar system and space exploration.
Seasonal Bottles: Create bottles with themes related to different seasons (e.g., fall leaves, winter snowflakes, spring flowers).
Safety Tips and Considerations for Sensory Bottle Use
While sensory bottles are generally safe, it’s important to take a few precautions:
Supervision: Always supervise children while they are playing with sensory bottles, especially younger children who may be tempted to put them in their mouths.
Secure the Lid: Ensure the lid is tightly sealed and glued to prevent leaks and spills. Regularly check the lid for any signs of damage or loosening.
Material Selection: Choose non-toxic materials for the bottle contents. Avoid using small objects that could be choking hazards for young children.
Bottle Material: Opt for plastic bottles over glass, especially for younger children, to prevent breakage. Inspect the bottle regularly for cracks or damage.
Allergies: Be mindful of any potential allergies when selecting materials. For example, if a child has a glitter allergy, use alternative materials.
Storage: Store sensory bottles in a safe place where they won’t be accidentally knocked over or damaged.
By following these safety tips, you can ensure that sensory bottles provide a safe and enjoyable learning experience for children.
No products found.
Previous Post
Next Post


- Air Fryer Revolution: Your Guide to Crispy, Healthy & Fast Cooking

- AirPods: A Comprehensive Guide to Apple’s Wireless Earbuds
- Amazon Echo Dot: A Comprehensive Guide to Smart Home Automation
- Amazon Fire Stick: Your Ultimate Guide to Streaming Entertainment
- Apple TV: Your Comprehensive Guide to Streaming Bliss in 2024
- Apple Watch SE: The Smart Choice for a Smarter Lifestyle
- Apple Watch Series 9: A Deep Dive into the Latest Features and Innovations
- Apple Watch Ultra 2: A Deep Dive into the Ultimate Adventure Companion
- Apple Watch Ultra: The Ultimate Adventure Companion – A Deep Dive Review
- Apple Watch: A Comprehensive Guide to Features, Benefits, and Choosing the Right Model


