Now Reading: DIY Idea: Design Personalized Holiday Cards with Hand Lettering and Stamps
- 01
DIY Idea: Design Personalized Holiday Cards with Hand Lettering and Stamps
DIY Idea: Design Personalized Holiday Cards with Hand Lettering and Stamps
Why DIY Holiday Cards? Spread Joy with a Personal Touch
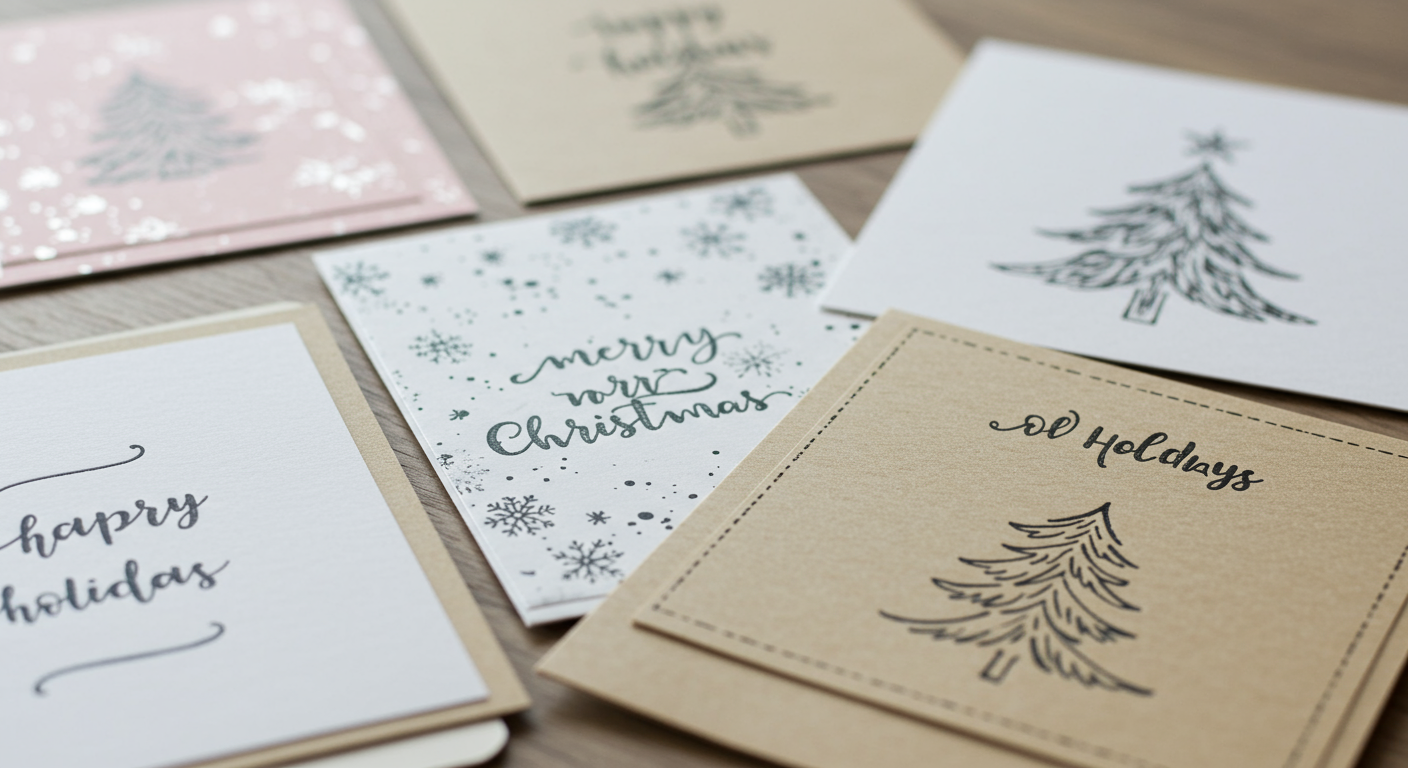
In a world of digital communication, a handwritten holiday card stands out. It shows you took the time and effort to create something special, making your message all the more meaningful. DIY holiday cards offer a fantastic opportunity to express your creativity, personalize your greetings, and create lasting memories. Plus, it’s a fun activity to do with family and friends! Forget generic store-bought cards, let’s dive into the world of handmade holiday cheer!
This tutorial will guide you through creating stunning, personalized holiday cards using hand lettering and stamps. No advanced skills are required – just a willingness to experiment and have fun!
Gather Your Supplies: The Essential Toolkit for Card Creation
Before you start, gather your supplies. Having everything within reach will make the process smoother and more enjoyable.
- Cardstock: Choose a good quality cardstock in your preferred color and size. White, cream, and kraft paper are popular choices. Consider pre-folded cards for convenience.
- Pens for Hand Lettering: Brush pens (like Tombow Dual Brush Pens), calligraphy pens, or even fine-tipped markers work well. Experiment with different sizes and colors to find what you like best.
- Stamps: Holiday-themed stamps are essential! Look for designs you love – snowflakes, trees, ornaments, reindeer, and festive greetings. Clear stamps are great for precise placement.
- Ink Pads: Choose inks that complement your cardstock and stamps. Archival inks are best for long-lasting impressions. Consider metallic inks for a touch of sparkle.
- Embellishments: Add extra flair with embellishments like glitter, ribbon, sequins, washi tape, and small adhesive gems.
- Adhesive: Use a glue stick, double-sided tape, or adhesive dots to attach embellishments.
- Scissors or Paper Cutter: For trimming cardstock and ribbon.
- Ruler: For measuring and creating straight lines.
- Pencil and Eraser: For sketching your design before committing with ink.
- Acrylic Block (for clear stamps): Necessary for using clear stamps.

Hand Lettering Basics: Adding a Personal Flourish
Don’t be intimidated by hand lettering! You don’t need to be a professional calligrapher to create beautiful cards. Here are a few simple techniques to get you started:
- Faux Calligraphy: This is a great beginner-friendly technique. Write your word in a basic sans-serif font. Then, thicken the downstrokes (the lines you draw downwards) by adding a second line and filling in the space.
- Bounce Lettering: Instead of keeping all your letters perfectly aligned on the baseline, make some letters taller and some shorter to create a playful, bouncy effect.
- Basic Lettering Styles: Practice different lettering styles – serif, sans-serif, script. Experiment with different weights and angles.
- Add Flourishes: Simple flourishes like swirls, loops, and dots can add a touch of elegance to your lettering.
Practice makes perfect! Before writing on your cards, practice your lettering on a separate piece of paper. Try different words and phrases like “Merry Christmas”, “Happy Holidays”, “Season’s Greetings”, or personalized names. Look for online tutorials and lettering templates for inspiration.
No products found.
Stamping Techniques: Creating Festive Patterns and Designs
Stamps are a fantastic way to add visual interest and create repeating patterns on your holiday cards.
- Even Inking: Ensure your stamp is evenly inked by tapping the ink pad lightly across the entire surface of the stamp.
- Precise Placement: Use an acrylic block to position clear stamps accurately. Press the stamp firmly and evenly onto the cardstock.
- Overlapping Images: Create depth and visual interest by overlapping stamped images.
- Creating Patterns: Repeat a single stamp to create a border or a background pattern. Use different colors of ink for a more dynamic effect.
- Masking: Use masking tape or paper to cover parts of your cardstock before stamping, creating interesting layered effects.
Experiment with different ink colors and stamp combinations. Try stamping a background of snowflakes in light blue ink and then adding a larger Christmas tree in green ink. Use metallic inks for a touch of glamour.
Putting It All Together: Designing Your Personalized Holiday Card
Now it’s time to combine your hand lettering and stamping skills to create your unique holiday cards!
- Sketch Your Design: Use a pencil to lightly sketch your design on the cardstock. This will help you plan the placement of your lettering, stamps, and embellishments.
- Hand Letter Your Greeting: Using your chosen pen and lettering style, carefully write your holiday greeting. Take your time and focus on creating neat and legible lettering.
- Add Stamped Images: Incorporate your chosen stamps to complement your lettering. Use different colors of ink and experiment with overlapping images.
- Embellish Your Card: Add embellishments like glitter, ribbon, sequins, or washi tape to add extra flair.
- Erase Pencil Lines: Once the ink is dry, gently erase any visible pencil lines.
- Personalize the Inside: Don’t forget to write a heartfelt message inside the card!
Tips for a Professional Finish:
- Use high-quality materials.
- Take your time and pay attention to detail.
- Practice your lettering and stamping techniques before creating your final card.
- Don’t be afraid to experiment and get creative!
Congratulations! You’ve created a beautiful, personalized holiday card that your loved ones will cherish. Now, go spread some holiday cheer!
No products found.
Related Posts


Previous Post
Next Post


- Air Fryer Revolution: Your Guide to Crispy, Healthy & Fast Cooking

- AirPods: A Comprehensive Guide to Apple’s Wireless Earbuds
- Amazon Echo Dot: A Comprehensive Guide to Smart Home Automation
- Amazon Fire Stick: Your Ultimate Guide to Streaming Entertainment
- Apple TV: Your Comprehensive Guide to Streaming Bliss in 2024
- Apple Watch SE: The Smart Choice for a Smarter Lifestyle
- Apple Watch Series 9: A Deep Dive into the Latest Features and Innovations
- Apple Watch Ultra 2: A Deep Dive into the Ultimate Adventure Companion
- Apple Watch Ultra: The Ultimate Adventure Companion – A Deep Dive Review
- Apple Watch: A Comprehensive Guide to Features, Benefits, and Choosing the Right Model


