Now Reading: DIY Idea: Create a Cozy Soft Pom Pom Rug
- 01
DIY Idea: Create a Cozy Soft Pom Pom Rug
DIY Idea: Create a Cozy Soft Pom Pom Rug
Introduction: Embrace the Pom Pom Rug Trend
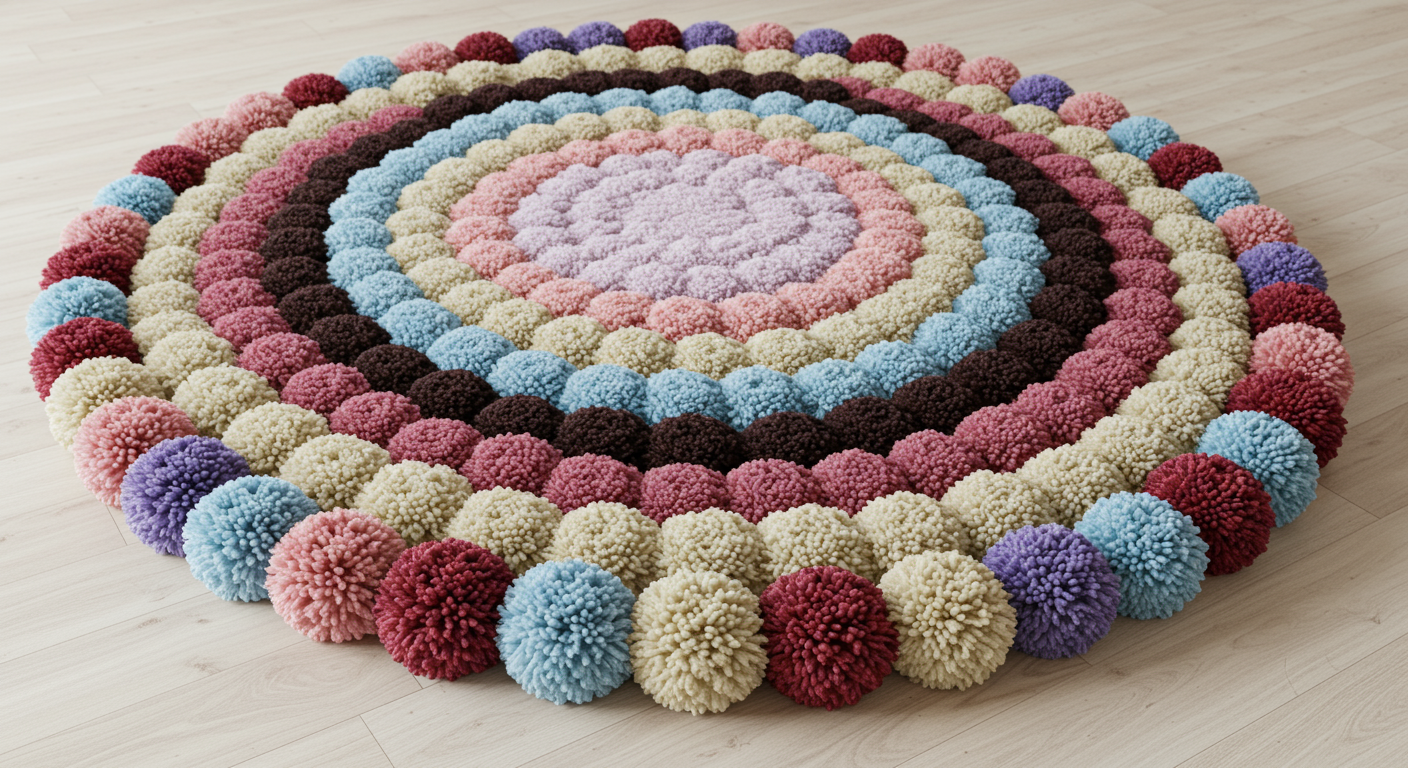
In the realm of DIY home decor, the pom pom rug reigns supreme for its sheer cuteness and cozy appeal. These rugs are not only visually delightful but also offer a tactile experience that’s hard to resist. Imagine sinking your feet into a cloud of soft, fluffy yarn. This DIY project is perfect for adding a personal touch to your living space, creating a playful atmosphere, and repurposing leftover yarn. Ready to embark on a crafting adventure? Let’s create a soft and unique pom pom rug that will transform any room!
This project is incredibly versatile. You can customize the size, shape, and color scheme to perfectly match your existing decor. Whether you’re aiming for a vibrant and eclectic vibe or a more subdued and minimalist aesthetic, the pom pom rug can be tailored to your specific preferences. Plus, it’s a fantastic way to involve kids in a fun and creative activity. They’ll love helping you make the pom poms!
Beyond its aesthetic appeal, a pom pom rug also offers practical benefits. Its plush texture provides cushioning underfoot, making it ideal for nurseries, playrooms, or any area where you want to create a comfortable and inviting space. It can also help to insulate your floors, keeping your feet warm during the colder months.
Materials You’ll Need: Gathering Your Supplies
Before you begin, gather all the necessary materials. This will ensure a smooth and efficient crafting process. Here’s a comprehensive list:
- Yarn: Choose your favorite colors and yarn type (wool, acrylic, cotton, or a blend). Consider the thickness of the yarn – thicker yarn will result in larger, fluffier pom poms. The amount of yarn needed depends on the size of your rug. A general guideline is to estimate based on the area you want to cover and then buy extra.
- Rug Mat: A non-slip rug mat or canvas mesh provides the base for your pom pom creation. Select a size and shape that suits your desired rug dimensions. Consider using a pre-made rug mat with holes for easy attachment or a solid canvas that you can customize.
- Pom Pom Maker: While you can make pom poms using cardboard circles, a pom pom maker simplifies and speeds up the process. These handy tools come in various sizes, allowing you to create uniform pom poms effortlessly.
- Scissors: A sharp pair of scissors is essential for cutting the yarn and trimming the pom poms.
- Hot Glue Gun (Optional): If your rug mat doesn’t have pre-made holes, a hot glue gun can be used to secure the pom poms. However, sewing is a more durable option.
- Needle and Thread (Optional): For a more secure and long-lasting attachment, use a needle and thread to sew the pom poms onto the rug mat.
- Measuring Tape or Ruler: For precise measurement and placement of pom poms, measuring tape or ruler will be helpful.
Tip: When choosing yarn, consider the washability. If you plan to use the rug in a high-traffic area, opt for a yarn that can be easily cleaned.

Step-by-Step Guide: Crafting Your Pom Pom Masterpiece
Now comes the fun part – bringing your pom pom rug to life! Follow these step-by-step instructions to create your own cozy masterpiece:
- Make the Pom Poms: Using your chosen method (pom pom maker or cardboard circles), create a large quantity of pom poms in your desired colors and sizes. Remember, consistency is key for a professional-looking rug. To use a pom pom maker, follow the instructions provided with the tool. If using cardboard circles, cut two identical circles with a hole in the center. Wrap yarn around the circles until they are thick and full. Cut the yarn along the outer edge of the circles, then tie a piece of yarn tightly around the center to secure the pom pom. Remove the cardboard circles and fluff the pom pom.
- Trim the Pom Poms: Once you have a collection of pom poms, trim them to create a uniform and rounded shape. This step is crucial for achieving a polished and professional finish. Use sharp scissors to carefully trim any stray strands of yarn.
- Attach the Pom Poms: There are two main methods for attaching the pom poms to the rug mat: gluing and sewing. For gluing, apply a generous amount of hot glue to the back of the pom pom and press it firmly onto the rug mat. Hold it in place for a few seconds until the glue sets. For sewing, use a needle and thread to sew the pom pom onto the rug mat. This method is more time-consuming but provides a more durable and secure attachment. Start from the center of the rug mat and work your way outwards, arranging the pom poms in a dense and even pattern. Experiment with different color combinations and arrangements to create a unique and personalized design.
- Fill in the Gaps: Once you’ve attached the majority of the pom poms, step back and assess your progress. Identify any gaps or sparse areas and fill them in with additional pom poms. This will ensure a full and fluffy rug.
- Finishing Touches: Once all the pom poms are securely attached, give your rug a final inspection. Trim any loose ends or stray strands of yarn. You can also add a non-slip backing to the rug mat to prevent it from sliding on your floors. Enjoy your cozy and handmade pom pom rug!
Tip: If you’re using a hot glue gun, work in small sections and allow the glue to cool completely before moving on to the next section. This will prevent the pom poms from shifting or falling off.
No products found.
Creative Variations: Personalize Your Pom Pom Rug
One of the best things about DIY projects is the opportunity to personalize them to your own taste. Here are a few creative variations to inspire your pom pom rug design:
- Color Blocking: Create a bold and modern look by using large blocks of color. Divide your rug mat into sections and fill each section with pom poms of a different color.
- Ombre Effect: Achieve a gradual and subtle transition of color by using different shades of the same hue. Start with a light shade at one end of the rug and gradually transition to a darker shade at the other end.
- Geometric Patterns: Incorporate geometric shapes and patterns into your rug design. Use different colored pom poms to create triangles, squares, or other geometric forms.
- Shag Rug Style: Make longer, shaggier pom poms for an ultra-plush and luxurious feel. Experiment with different yarn textures to add depth and interest.
- Themed Rugs: Create a themed rug for a specific room or occasion. For example, a nautical-themed rug for a bathroom or a holiday-themed rug for the festive season.
Tip: Before you start attaching the pom poms, sketch out your design on paper to visualize the final result. This will help you to avoid mistakes and ensure that you’re happy with the overall look of your rug.
Care and Maintenance: Keeping Your Rug Looking Its Best
To ensure that your pom pom rug stays looking its best for years to come, follow these simple care and maintenance tips:
- Shake it Out: Regularly shake out your rug to remove any loose dirt or debris.
- Spot Clean: For minor spills or stains, spot clean the affected area with a mild detergent and a damp cloth. Avoid using harsh chemicals or abrasive cleaners.
- Hand Wash (If Possible): If your rug is small enough, you can hand wash it in a tub or sink. Use cool water and a mild detergent. Gently agitate the rug to remove any dirt or stains. Rinse thoroughly and allow it to air dry completely.
- Vacuum with Care: If you choose to vacuum your rug, use a low-power setting and a brush attachment. Avoid using a beater bar, as it can damage the pom poms.
- Avoid Direct Sunlight: Prolonged exposure to direct sunlight can cause the yarn to fade. Place your rug in a location that is not directly exposed to sunlight or use curtains or blinds to filter the light.
- Rotate Regularly: Rotate your rug regularly to distribute wear and tear evenly. This will help to prevent certain areas from becoming matted or worn down.
Tip: If your pom pom rug becomes matted or flattened, gently fluff the pom poms with your fingers to restore their shape. You can also use a fabric steamer to help revive the yarn.
With a little care and attention, your handmade pom pom rug will continue to bring joy and comfort to your home for many years. Happy crafting!
No products found.
Related Posts


Previous Post
Next Post

- Air Fryer Revolution: Your Guide to Crispy, Healthy & Fast Cooking

- AirPods: A Comprehensive Guide to Apple’s Wireless Earbuds
- Amazon Echo Dot: A Comprehensive Guide to Smart Home Automation
- Amazon Fire Stick: Your Ultimate Guide to Streaming Entertainment
- Apple TV: Your Comprehensive Guide to Streaming Bliss in 2024
- Apple Watch SE: The Smart Choice for a Smarter Lifestyle
- Apple Watch Series 9: A Deep Dive into the Latest Features and Innovations
- Apple Watch Ultra 2: A Deep Dive into the Ultimate Adventure Companion
- Apple Watch Ultra: The Ultimate Adventure Companion – A Deep Dive Review
- Apple Watch: A Comprehensive Guide to Features, Benefits, and Choosing the Right Model


