Now Reading: DIY Delight: Crafting Unique Pressed Flower Bookmarks
- 01
DIY Delight: Crafting Unique Pressed Flower Bookmarks
DIY Delight: Crafting Unique Pressed Flower Bookmarks
Introduction: A Touch of Nature in Your Reading
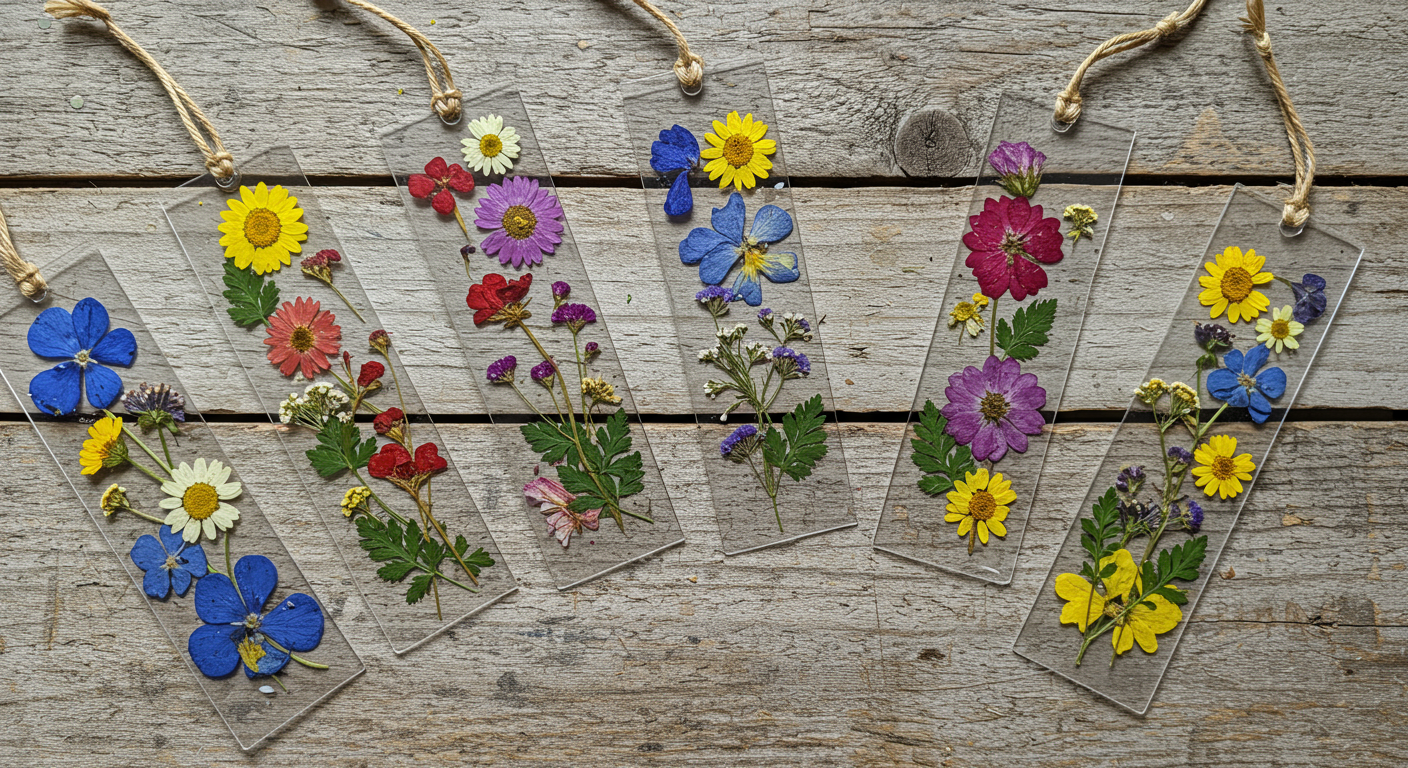
Reading a good book is a journey, and what better way to mark your place than with a bookmark as unique and beautiful as the story itself? In this DIY project, we’ll explore how to create stunning, personalized bookmarks using watercolor paper and the delicate beauty of pressed flowers. This isn’t just about making a bookmark; it’s about capturing a moment in nature, preserving its beauty, and adding a touch of handmade charm to your reading experience.
This craft is perfect for beginners and seasoned crafters alike. It’s a relaxing and rewarding project that yields truly one-of-a-kind results. Plus, it makes a thoughtful and personalized gift for book lovers in your life.
Gathering Your Supplies: The Essential Toolkit
Before we begin, let’s gather our supplies. Here’s what you’ll need:
1. Watercolor Paper: Choose a sturdy watercolor paper, preferably 140lb or higher. This will provide a durable base for your bookmark and handle the adhesive without warping too much. Cut the paper into rectangular strips, approximately 2 inches wide and 6-8 inches long, depending on your preference.
2. Pressed Flowers: The star of the show! You can either press your own flowers using a flower press (a classic method!) or purchase pre-pressed flowers from a craft store or online. Consider a variety of colors, shapes, and sizes to create visually appealing designs. Think about using petals, leaves, and even small stems.
3. Clear Drying Glue/Mod Podge: Select a clear-drying adhesive that won’t yellow over time. Mod Podge is a popular choice, but any craft glue specifically designed for paper will work. Avoid using glues that may wrinkle or damage the paper.
4. Soft Paintbrush: You’ll need a soft paintbrush to apply the glue evenly onto the watercolor paper.
5. Tweezers: Tweezers are helpful for precisely placing the delicate pressed flowers.
6. Scissors: For trimming any excess paper or adjusting the shape of your pressed flowers.
7. Laminator (Optional): A laminator provides a protective layer to your bookmark, making it more durable and resistant to damage. If you don’t have a laminator, you can use clear contact paper as an alternative.
8. Hole Punch (Optional): If you want to add a tassel or ribbon, a hole punch will be necessary.
9. Tassel/Ribbon (Optional): To add an extra touch of elegance and personalization.

Step-by-Step Guide: Creating Your Floral Masterpiece
Now, let’s dive into the crafting process:
Step 1: Prepare Your Watercolor Paper: Cut your watercolor paper into the desired bookmark size. You can round the corners for a softer look if you prefer.
Step 2: Design Your Layout: Before applying any glue, arrange your pressed flowers on the watercolor paper to create your desired design. Experiment with different arrangements until you’re happy with the overall composition. Consider the colors, shapes, and sizes of the flowers to create a visually balanced and aesthetically pleasing design.
Step 3: Apply Glue: Using your soft paintbrush, carefully apply a thin, even layer of glue to the back of each pressed flower. You can also apply a thin layer of glue directly onto the watercolor paper where you want to place the flower. Be careful not to use too much glue, as it can cause the paper to wrinkle.
Step 4: Place the Flowers: Using tweezers, carefully place the glued pressed flowers onto the watercolor paper according to your design. Gently press down on each flower to ensure it adheres securely to the paper.
Step 5: Drying Time: Allow the glue to dry completely. This may take several hours, depending on the type of glue you’re using. It’s best to leave the bookmarks undisturbed during the drying process.
Step 6: Laminate (Optional): Once the glue is completely dry, laminate your bookmarks using a laminator. This will protect the flowers and paper from damage and make the bookmark more durable. If you don’t have a laminator, you can use clear contact paper to cover the bookmarks.
Step 7: Trim and Finish: Trim any excess lamination or contact paper around the edges of the bookmark. If desired, use a hole punch to create a hole at the top of the bookmark and attach a tassel or ribbon.
No products found.
Tips and Tricks for Stunning Results
Here are some tips and tricks to help you create even more beautiful pressed flower bookmarks:
Flower Selection: Choose flowers that press well, such as pansies, violets, daisies, and ferns. Avoid flowers with thick, fleshy petals, as they may not dry properly. Experiment with different colors and textures to create unique designs.
Pressing Techniques: For best results, press your flowers immediately after picking them. Place the flowers between sheets of absorbent paper, such as newspaper or blotting paper, and then place them inside a heavy book or flower press. Allow the flowers to dry for several weeks until they are completely dry and brittle.
Arrangement Ideas: Consider creating symmetrical designs, asymmetrical designs, or even abstract designs. Play with different color combinations and textures to achieve your desired look. You can also add other embellishments, such as glitter, beads, or dried leaves.
Glue Application: Apply the glue sparingly to avoid warping the paper. Use a thin, even layer of glue and gently press down on each flower to ensure it adheres securely to the paper.
Protective Coating: Laminating or using clear contact paper will protect your bookmarks from moisture and damage, ensuring they last for years to come.
Beyond Bookmarks: Expanding Your Floral Creations
The techniques you’ve learned for creating pressed flower bookmarks can be applied to a variety of other crafts! Here are a few ideas to inspire you:
Pressed Flower Cards: Create beautiful greeting cards by adhering pressed flowers to cardstock. This is a perfect way to personalize your cards and add a touch of nature to your messages.
Pressed Flower Coasters: Decorate plain coasters with pressed flowers and seal them with resin for a durable and beautiful addition to your home decor.
Pressed Flower Jewelry: Incorporate pressed flowers into resin jewelry, such as pendants, earrings, and rings. This is a unique and eye-catching way to showcase the beauty of nature.
Framed Pressed Flower Art: Create stunning wall art by arranging pressed flowers in a frame. This is a beautiful way to preserve your favorite flowers and add a touch of elegance to your home.
Embrace the beauty of pressed flowers and let your creativity bloom! These simple techniques can be used to create a wide range of beautiful and personalized crafts.
No products found.
Related Posts


Previous Post
Next Post

- Air Fryer Revolution: Your Guide to Crispy, Healthy & Fast Cooking

- AirPods: A Comprehensive Guide to Apple’s Wireless Earbuds
- Amazon Echo Dot: A Comprehensive Guide to Smart Home Automation
- Amazon Fire Stick: Your Ultimate Guide to Streaming Entertainment
- Apple TV: Your Comprehensive Guide to Streaming Bliss in 2024
- Apple Watch SE: The Smart Choice for a Smarter Lifestyle
- Apple Watch Series 9: A Deep Dive into the Latest Features and Innovations
- Apple Watch Ultra 2: A Deep Dive into the Ultimate Adventure Companion
- Apple Watch Ultra: The Ultimate Adventure Companion – A Deep Dive Review
- Apple Watch: A Comprehensive Guide to Features, Benefits, and Choosing the Right Model


