Now Reading: DIY Idea: Create a Stylish & Practical Recycled Organizer with Tin Cans and Fabric
- 01
DIY Idea: Create a Stylish & Practical Recycled Organizer with Tin Cans and Fabric
DIY Idea: Create a Stylish & Practical Recycled Organizer with Tin Cans and Fabric
Introduction: Give Tin Cans a Second Life!
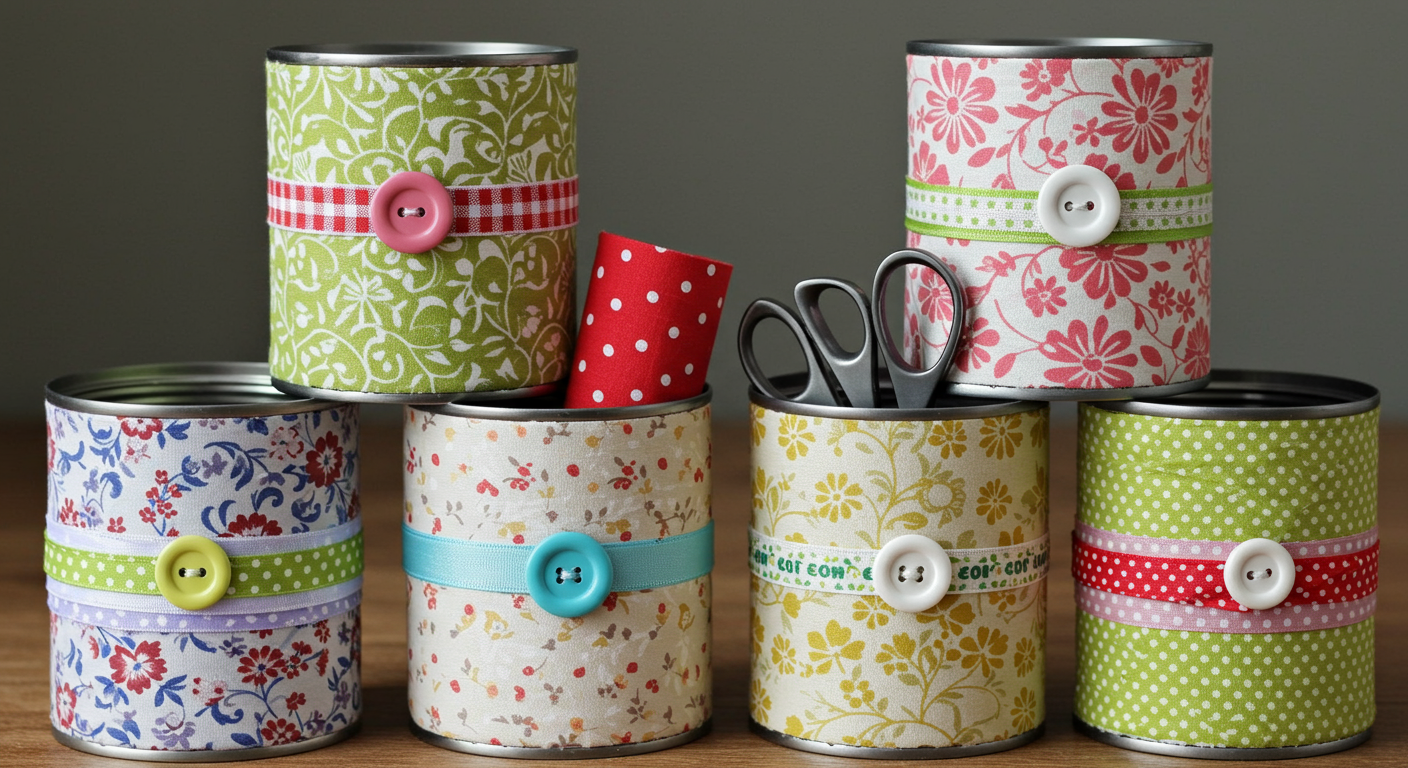
Are you looking for a fun and sustainable DIY project? Want to declutter your space without breaking the bank? Then look no further! This tutorial will guide you through creating a charming and practical recycled organizer using readily available materials: tin cans and fabric scraps. This project is not only budget-friendly but also eco-conscious, giving discarded tin cans a new lease on life. It’s a perfect way to personalize your desk, craft room, bathroom, or any space that needs a little organization. Get ready to unleash your creativity and transform trash into treasure!
This DIY tin can organizer is more than just a storage solution; it’s a statement about sustainability and resourcefulness. By repurposing materials, we’re reducing waste and contributing to a more eco-friendly lifestyle. Plus, it’s a fantastic opportunity to add a personal touch to your home decor. Choose fabrics that complement your existing style or create a bold contrast for a unique look. The possibilities are endless!
Materials You’ll Need
Before we dive into the crafting process, let’s gather all the necessary supplies. Here’s a comprehensive list of what you’ll need to create your DIY tin can organizer:
- Tin Cans: Collect various sizes of clean, empty tin cans. Ensure they are thoroughly washed and dried to prevent rust and unpleasant odors. Remove any sharp edges using a can opener that creates a smooth edge or use pliers to carefully bend them inward. The number of cans depends on the size and configuration of your desired organizer.
- Fabric Scraps: Gather your favorite fabric scraps! Cotton, linen, or even burlap work well. Choose fabrics that complement each other in terms of color, pattern, and texture. Consider upcycling old clothing or bedding for an even more sustainable approach. You’ll need enough fabric to cover the outside of each tin can with some overlap.
- Glue: A strong adhesive is essential for this project. Hot glue is a popular choice due to its quick-drying properties. However, fabric glue or a strong craft glue will also work effectively. Choose a glue that is suitable for both metal and fabric.
- Scissors: A sharp pair of scissors is crucial for accurately cutting the fabric.
- Ruler or Measuring Tape: Accurate measurements are key to ensuring a neat and professional finish.
- Pencil or Fabric Marker: Use a pencil or fabric marker to trace the can’s dimensions onto the fabric.
- Optional: Sandpaper (to smooth any rough edges on the cans), embellishments (buttons, ribbons, lace, etc.), paint (for the inside of the cans), sealant (to protect the fabric).
Safety Note: When working with sharp objects like scissors and glue guns, always exercise caution and follow safety guidelines.

Step-by-Step Instructions: Crafting Your Recycled Organizer
Now that you have all your materials ready, let’s begin the step-by-step process of creating your DIY tin can organizer:
- Prepare the Tin Cans: Thoroughly clean and dry the tin cans. Remove any labels and glue residue. If necessary, gently sand any rough edges to ensure a smooth surface. This will prevent the fabric from snagging or tearing. Consider painting the inside of the cans to add a pop of color or to prevent any potential rust. Let the paint dry completely before proceeding.
- Measure and Cut the Fabric: Measure the height and circumference of each tin can. Add an extra inch or two to both measurements to allow for overlap and a secure fit. Use a ruler or measuring tape and a pencil or fabric marker to trace the can’s dimensions onto the fabric. Carefully cut out the fabric pieces using sharp scissors.
- Attach the Fabric to the Cans: Apply glue to the outside of the tin can, starting at one edge. Carefully align the fabric edge with the glued area and gently press it into place. Continue applying glue and wrapping the fabric around the can, ensuring a smooth and even application. Overlap the fabric edges slightly and secure them with glue.
- Secure the Edges: Fold the excess fabric over the top and bottom edges of the can and secure them with glue. For a cleaner finish, you can fold the fabric inward before gluing it down. Ensure that the fabric is tightly adhered to the can to prevent any loose edges.
- Embellish (Optional): Once the glue has dried completely, you can embellish your tin can organizer with buttons, ribbons, lace, or any other decorative elements you desire. Get creative and personalize your organizer to match your style and decor.
- Arrange and Secure the Cans: Decide on the arrangement of your cans. You can group them together using strong glue or by placing them within a decorative box or tray. Consider adding a base made of cardboard or wood for added stability.
Tips and Tricks:
- Use different fabric patterns and textures for a visually appealing organizer.
- Experiment with different can sizes to create varying levels of storage.
- Add labels to the cans to easily identify their contents.
- Protect the fabric with a sealant to prevent stains and water damage.
No products found.
Creative Variations and Customization Ideas
The beauty of this DIY project lies in its versatility! Here are some creative variations and customization ideas to inspire you:
- Themed Organizers: Create themed organizers for specific purposes. For example, a sewing organizer with fabric featuring sewing-related motifs, or a bathroom organizer with waterproof fabric and seashell embellishments.
- Ombre Effect: Use fabrics in varying shades of the same color to create a stunning ombre effect.
- Patchwork Design: Piece together small squares of different fabrics to create a unique patchwork design for each can.
- Add Handles or Hanging Loops: Attach handles or hanging loops to the cans to create a portable or wall-mounted organizer.
- Decoupage: Instead of fabric, try decoupage using decorative paper, maps, or even sheet music.
- Personalized Monograms: Add personalized monograms to each can using paint, embroidery, or stencils.
Let your imagination run wild and create an organizer that is truly unique and reflects your personal style!
Conclusion: A Sustainable and Stylish Solution
Congratulations! You’ve successfully created a stylish and practical recycled organizer using tin cans and fabric. This project is a testament to the power of creativity and resourcefulness. Not only have you decluttered your space and organized your belongings, but you’ve also contributed to a more sustainable lifestyle by repurposing materials that would otherwise end up in the landfill.
This DIY tin can organizer is a fantastic example of how you can transform everyday objects into something beautiful and functional. Embrace the joy of crafting and continue to explore creative ways to recycle and repurpose materials in your home. Share your creations with friends and family and inspire them to embrace a more sustainable way of living.
Remember, the possibilities are endless! Keep experimenting, keep creating, and keep making a difference!
No products found.
Related Posts


Previous Post
Next Post


- Air Fryer Revolution: Your Guide to Crispy, Healthy & Fast Cooking

- AirPods: A Comprehensive Guide to Apple’s Wireless Earbuds
- Amazon Echo Dot: A Comprehensive Guide to Smart Home Automation
- Amazon Fire Stick: Your Ultimate Guide to Streaming Entertainment
- Apple TV: Your Comprehensive Guide to Streaming Bliss in 2024
- Apple Watch SE: The Smart Choice for a Smarter Lifestyle
- Apple Watch Series 9: A Deep Dive into the Latest Features and Innovations
- Apple Watch Ultra 2: A Deep Dive into the Ultimate Adventure Companion
- Apple Watch Ultra: The Ultimate Adventure Companion – A Deep Dive Review
- Apple Watch: A Comprehensive Guide to Features, Benefits, and Choosing the Right Model


