Now Reading: DIY Delight: Crafting Stunning Decorative Rope Baskets
- 01
DIY Delight: Crafting Stunning Decorative Rope Baskets
DIY Delight: Crafting Stunning Decorative Rope Baskets
Introduction: Unleash Your Inner Artisan with Rope Baskets
In today’s world, where mass-produced items dominate, there’s a growing desire for unique, handmade pieces that reflect our individual style and creativity. DIY projects offer a fantastic way to personalize our living spaces while engaging in a therapeutic and rewarding activity. Among the myriad of DIY options, crafting decorative rope baskets stands out as a simple yet elegant project that anyone can undertake.
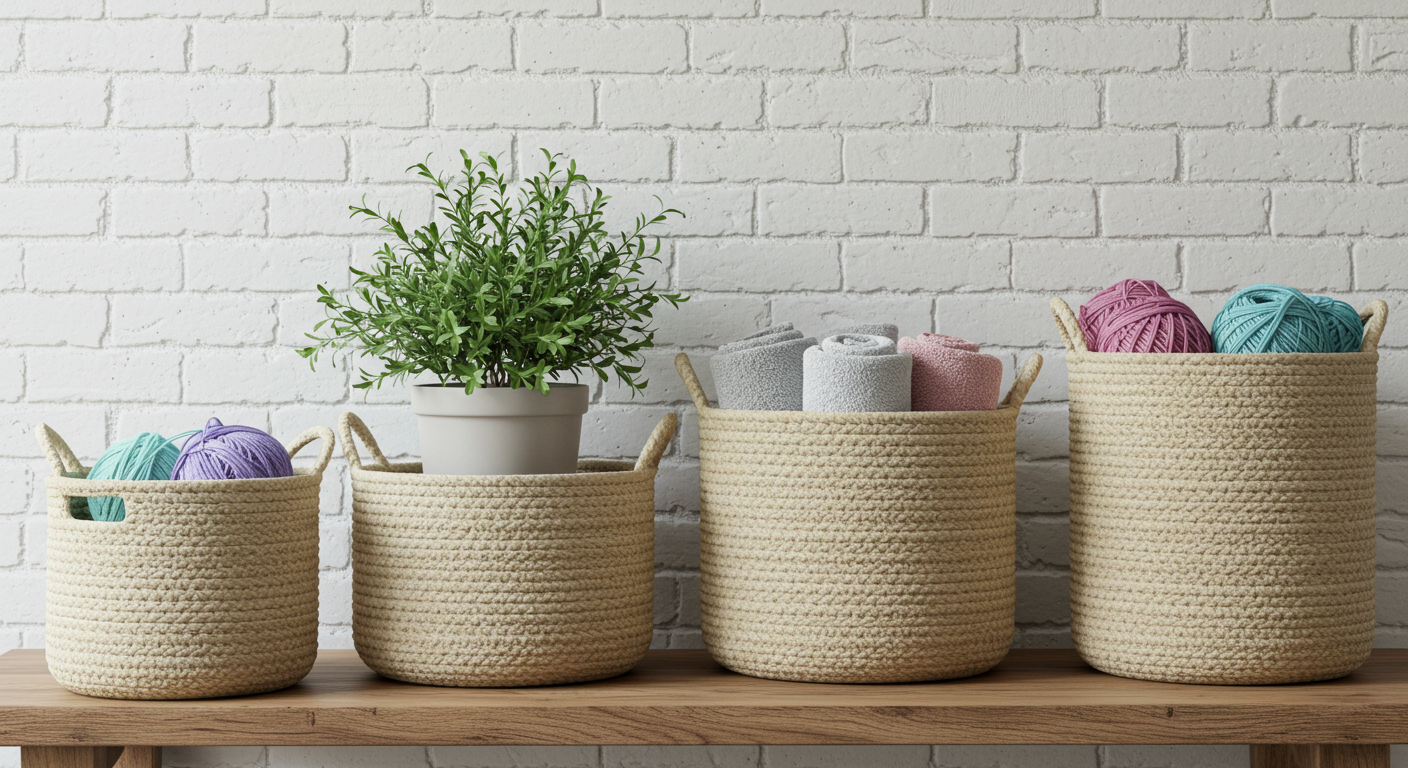
Rope baskets are incredibly versatile. They can be used for storage, as planters, or simply as decorative accents. Their natural texture and organic shape add a touch of rustic charm to any room, blending seamlessly with various décor styles, from modern farmhouse to bohemian chic. Best of all, creating these baskets is surprisingly easy, requiring only a few basic materials and a little patience. This guide will walk you through the process, providing step-by-step instructions and helpful tips to ensure your DIY rope basket project is a resounding success.
So, gather your supplies, clear your workspace, and prepare to unleash your inner artisan. Let’s embark on this creative journey together and transform ordinary rope into stunning decorative baskets that will add personality and functionality to your home.
Materials & Tools: Gathering Your Essentials for Rope Basket Success
Before diving into the construction process, it’s crucial to gather all the necessary materials and tools. Having everything readily available will streamline the project and ensure a smooth, enjoyable crafting experience.
Here’s a comprehensive list of what you’ll need:
- Rope: The star of the show! Choose a rope that is durable and visually appealing. Cotton rope is a popular choice for its soft texture and availability in various thicknesses. Jute rope offers a more rustic, natural look. The amount of rope needed will depend on the size of the basket you intend to create. As a general rule, it’s always better to have a little extra. Start with 100 feet for a smaller basket and increase as needed.
- Hot Glue Gun and Glue Sticks: A high-temperature hot glue gun is essential for securely bonding the rope coils together. Ensure you have plenty of glue sticks on hand, as you’ll be using a significant amount throughout the project. Consider purchasing a glue gun with adjustable temperature settings for greater control.
- Scissors or Utility Knife: These will be used to cut the rope cleanly. A sharp pair of scissors or a utility knife will work best.
- Bowl or Container (for Shaping): A bowl or container of the desired shape will serve as a mold for creating your basket. The size and shape of the bowl will directly influence the size and shape of the finished basket. Feel free to experiment with different shapes and sizes to create a variety of unique baskets.
- Optional: Embellishments such as beads, twine, fabric scraps, or paint can be used to personalize your baskets.
Safety First: Always exercise caution when using a hot glue gun. Avoid touching the nozzle or molten glue, and work in a well-ventilated area to minimize exposure to fumes.

Step-by-Step Guide: Crafting Your Decorative Rope Basket
Now that you have your materials and tools assembled, let’s dive into the exciting part: crafting your decorative rope basket. Follow these step-by-step instructions to create your own unique masterpiece:
- Prepare the Base: Start by creating a small, tight coil of rope. Apply a generous amount of hot glue to the end of the rope and begin wrapping it tightly around itself, forming a small circle. Continue adding glue and wrapping the rope until you have a base that is approximately 2-3 inches in diameter. This will be the bottom of your basket.
- Shape the Basket: Place your coiled base inside the bowl or container you’ve chosen for shaping. Begin adding more rope around the outside of the base, adhering it securely with hot glue. Make sure each coil is tightly pressed against the previous one to create a strong and cohesive structure.
- Build the Walls: As you continue adding rope, gradually start building up the sides of the basket. Maintain consistent tension on the rope to ensure the walls are even and stable. You can adjust the angle of the rope to create different shapes and curves. For example, slightly angling the rope outwards will create a wider basket, while angling it inwards will create a narrower basket.
- Finishing Touches: Once you’ve reached your desired height, it’s time to finish the top edge of the basket. Apply a final layer of glue to secure the last coil of rope. To create a clean and polished look, you can carefully trim any excess rope with scissors or a utility knife.
- Embellishments (Optional): Now comes the fun part – adding embellishments to personalize your basket! You can glue on beads, wrap twine around the basket, add fabric scraps, or even paint the rope to create a unique and eye-catching design. Let your creativity run wild!
Tips for Success:
- Work in Small Sections: Apply glue in small sections to prevent it from drying out before you can adhere the rope.
- Press Firmly: Press each coil of rope firmly against the previous one to ensure a strong and secure bond.
- Adjust as Needed: Don’t be afraid to adjust the shape of the basket as you go. If you notice any gaps or unevenness, simply add more glue and rope to fill them in.
- Let it Cool: Allow the glue to cool completely before handling the basket to prevent burns.
No products found.
Creative Variations: Explore Different Rope Basket Designs
The beauty of DIY projects lies in their adaptability. Once you’ve mastered the basic technique of crafting rope baskets, you can start exploring different designs and variations to create truly unique pieces that reflect your personal style.
Here are a few ideas to spark your creativity:
- Two-Tone Baskets: Use two different colors of rope to create a striking two-tone effect. Alternate colors with each coil, or use one color for the base and another for the walls.
- Ombre Baskets: Create a subtle and sophisticated ombre effect by gradually transitioning from a light to a dark shade of rope.
- Handle Baskets: Add handles to your baskets for easy carrying. You can create handles using rope, leather straps, or even metal rings.
- Patterned Baskets: Incorporate patterns into your baskets by alternating different types of rope or adding embellishments in a specific arrangement.
- Mini Baskets: Create tiny rope baskets for holding jewelry, small office supplies, or even as decorative accents on shelves and tables.
Beyond the Basics: Consider incorporating other materials into your rope baskets, such as fabric scraps, beads, shells, or even dried flowers. The possibilities are endless!
Beyond Decoration: Practical Uses for Your Rope Baskets
While rope baskets are undoubtedly beautiful decorative accents, they are also incredibly practical and versatile. Their sturdy construction and natural texture make them ideal for a wide range of storage and organizational purposes.
Here are just a few ideas for using your rope baskets:
- Storage for Small Items: Use rope baskets to store small items such as keys, wallets, phones, and sunglasses in your entryway.
- Bathroom Organization: Keep your bathroom organized by using rope baskets to store toiletries, towels, and washcloths.
- Plant Holders: Add a touch of greenery to your home by using rope baskets as plant holders. Be sure to line the basket with plastic before adding soil to prevent leaks.
- Toy Storage: Keep your children’s toys organized by using large rope baskets to store blocks, dolls, and other playthings.
- Laundry Baskets: Create a stylish and functional laundry basket by using a large rope basket.
- Office Organization: Use rope baskets to organize your desk and office supplies, such as pens, paperclips, and notepads.
Sustainable Style: By creating your own rope baskets, you’re not only adding beauty and functionality to your home but also contributing to a more sustainable lifestyle. You’re repurposing materials and reducing your reliance on mass-produced items, making a positive impact on the environment.
Conclusion: Crafting decorative rope baskets is a rewarding and enjoyable DIY project that allows you to unleash your creativity and add a touch of rustic charm to your home. With a few basic materials and a little patience, you can create stunning baskets that are both beautiful and functional. So, gather your supplies, get crafting, and transform ordinary rope into extraordinary works of art!
No products found.
Related Posts


Previous Post
Next Post


- Air Fryer Revolution: Your Guide to Crispy, Healthy & Fast Cooking

- AirPods: A Comprehensive Guide to Apple’s Wireless Earbuds
- Amazon Echo Dot: A Comprehensive Guide to Smart Home Automation
- Amazon Fire Stick: Your Ultimate Guide to Streaming Entertainment
- Apple TV: Your Comprehensive Guide to Streaming Bliss in 2024
- Apple Watch SE: The Smart Choice for a Smarter Lifestyle
- Apple Watch Series 9: A Deep Dive into the Latest Features and Innovations
- Apple Watch Ultra 2: A Deep Dive into the Ultimate Adventure Companion
- Apple Watch Ultra: The Ultimate Adventure Companion – A Deep Dive Review
- Apple Watch: A Comprehensive Guide to Features, Benefits, and Choosing the Right Model


